Bread Proofing Table | Proofing Timetables

Here is a proofing timetable for you to use as a guide when preparing bread. It is also a useful tool that displays the impact of kneading and prefermented flour on the total production duration. It explains how long bread takes to make.
What impacts the length of proofing?
There are many variables that affect the length of dough development. These include the bacteria levels in the flour and the water, the efficiency of kneading, the use of other ingredients and hydration levels. However, the most important factors are the dough proofing temperature and the quantity of yeast used.
Throughout the bake, it’s best to learn how to test the dough and detect how the gluten and gas develop. This will allow you to let the dough tell you when it is ready to move on to the next stage. Learning how the dough feels is a better indicator than the length of time. Use this page as a guide, not a handbook.
Bread proofing timetable
The standard proofing temperature used is 28C (82F) unless stated otherwise.
| Bread making method Vs Time spent at each stage |
Straight dough |
Straight dough with autolyse |
Dough with preferment |
Long kneaded – short bulk |
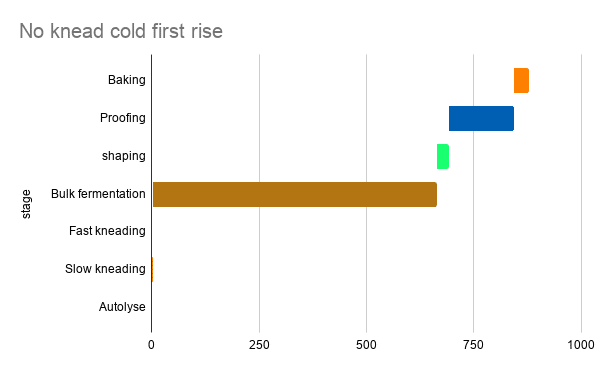
Standard artisan method with cool bulk fermentation | No-knead cold bulk fermentation |
|---|---|---|---|---|---|---|
Autolyse | 0 | 30 | 0 | 0 | 0 | 0 |
Slow kneading | 6 | 3 | 5 | 8 | 4 | 3 |
Fast kneading | 6 | 5 | 5 | 7 | 3 | 0 |
Bulk fermentation | 180 | 150 | 100 | 60 | 360 | 660* |
Shaping | 20 | 20 | 20 | 15 | 30 | 30 |
Proofing | 120 | 120 | 100 | 80 | 150 | 150 |
Baking | 35 | 35 | 35 | 35 | 35 | 35 |
TOTAL | 367 | 363 | 265 | 205 | 582 | 878 |
* 8 hours fridge fermentation with 3 hours at ambient temperature.
Notice with a no-knead method, the total time is increased whilst the physical working of the dough decreases
Straight dough method
This is a traditional straight dough made with yeast. We can then use this as a benchmark to compare the other methods.

Straight dough with autolyse
Notice how the 30 minute autolyse reduces how long the bread is kneaded, and how long the dough typically requires in bulk fermentation. The total length of production won’t reduce too much yet using this extra stage will benefit the bread.

Dough with preferment
Maturing a portion of the flour in the recipe improves the maturity of the dough. Using a prefermented flour levain reduces the amount of kneading required and reduces the length of the bulk fermentation.

Quick bread process
This is a long knead, short rise process. To speed up the total baking time the dough can be kneaded further. This accelerates the rate that the gluten network forms to reduce bulk fermentation duration. More yeast and using dough improvers such as ascorbic acid and malt or bean flour are often used. With these adaptations, the bulk fermentation stage can be removed.

Standard artisan method with cool fermentation
Artisan bakers use cool temperatures to slowly develop their bread. You might not have much of an influence on your bread proofing temperature depending on your local climate! Artisan bread like this will be fermented at around 24C (75F). The cool development aids flavour and develops more organic acids in the dough. Notice how the kneading time is reduced to avoid over-oxidation.

No knead dough with a cool first rise
Extending the development time is done by cooling the dough in the fridge. This means the dough should only be lightly kneaded, or just incorporated. Allow the bulk fermentation to hydrate the flour and gently develop the gluten.

A no knead bread with a series of stretch and folds
This method of baking replaces kneading with a series of stretch and folds or slap and folds. I recommend placing a stretch and fold into the dough every hour or two in all of the above methods (to see why and learn the common methods used, view the stretch and fold post).
There are many methods that replace kneading and use stretch and folds every 30 minutes or so for 2-4 hours. The dough is then moved straight on to shaping or left untouched to bulk ferment for a while to develop further. Different versions of the traditional stretch and fold have been developed to work gluten harder. I’ve not been able to fit this into the table above, but here’s the diagram displaying the stages:

If you’ve enjoyed this article and wish to treat me to a coffee, you can by following the link below – Thanks x

Hi, I’m Gareth Busby, a baking coach, senior baker and bread-baking fanatic! My aim is to use science, techniques and 15 years of baking experience to make you a better baker.
Table of Contents
Related Recipes
Related Articles
Latest Articles
Baking Categories
Disclaimer
Address
53 Greystone Avenue
Worthing
West Sussex
BN13 1LR
UK


Leave a Reply