

Proofing is the part of the bread baking process when the dough rises until it is ready for the oven. When proofing dough, it’s important that it isn’t over-proofed or under-proofed. Mastering the proofing of bread can be the difference between delicious fluffy bread and a flat loaf disaster!
Years ago, yeast wasn’t as high quality, so bakers would have to “prove” that it was active by mixing it with warm water and watching it froth. The term proofing either derives from “proofing” that the yeast is active or the notion that the dough shows “proof” that it is ready for the oven. I’m not too sure which origin is correct, but I suppose it doesn’t really matter!
Proofing is the process of anaerobic and aerobic yeast respiration caused by the yeast consuming sugars in the flour. These processes produce carbon dioxide and the dough’s gluten network captures the gas. As the gas fills air pockets in the gluten, the pockets stretch and the dough expands. The expansion forces the bread to roughly double in size before it is baked in the oven.
Bulk fermentation vs the second rise
The first rise is called bulk fermentation or the first proof. It is where the dough is left to rest between kneading and shaping. Its purpose is to mature the dough and strengthen the dough structure. The fermenting dough produces ethanol, lactic, acetic, and other various organic acids and proteins. These products are natural dough improvers that are essential for the bread. They aid the dough’s ability to retain gas, develop flavour and improve the texture of the crumb. Although gas is produced during bulk fermentation, many bakers reduce gas production by using cooler proofing temperatures (more on this later).
The second rise focuses on filling the structure with gas to make the bread rise. The natural dough improvers multiply whilst the gluten structure continues to form, but these are not the primary purpose of the second rise. It’s the production of carbon dioxide which is the target output. Most bakers build the dough structure in the first rise to inflate it with gas in the second, though there are some who will
to gain maturity during proofing. Chilling the dough slows yeast activity which assists the baking schedule so you, the baker, can sleep. Once the bread has risen, proofing ends and the bread goes into the oven.
Note: Many bakeries add dough improvers or conditions such as ascorbic acid to remove the need for a first rise. But for home and artisan bakers, it’s common to double rise the bread.
How long should the final proof last?
Typically, the final proof lasts between 1 and 4 hours. If using cooler proofing temperatures the proofing time can be extended. Yeast is most active in warmer dough temperatures, so bread is often proofed at around 30-35C (86-95F). Bakers in industrial bakeries prefer these warmer proofing temperatures, however, artisan bakers use cooler temperatures and therefore have longer final rises.
Tip: Long bulk fermentation, followed by a long final rise can cause the bread to be over-fermented so is used with caution.
Factors that determine the length of the rise
Gauging when bread is ready to bake by just following a recipe’s stated proofing time is unlikely to be a success. There are many variables that affect the rate of the rise. Not taking these into account can result in an over or under-proofed dough. The factors that determine the speed of the rise and their effect are displayed in the following table:
| Variable | Impact of the rise if increased | Impact of the rise if decreased |
| The temperature of the room | Speeds up | Slows down |
| The dough temperature after mixing | Speeds up | Slows down |
| The activity of the levain | Speeds up | Slows down |
| The amount of levain | Speeds up | Slows down |
| Flour flora – organic bacteria | Speeds up | Slows down |
| Mixing time/effectiveness | Speeds up | Slows down |
| The viscosity of the dough | A wet or sticky dough will rise faster unless it is very wet | Slows down |
| The mineral activity of the water | Slow to start, then gets faster | Quick to start but doesn’t improve |
| Humidity | Speeds up | Slows down |
For bread to take the same time to rise each time the recipe is produced, all factors must be taken into account. Although recipe precision is virtually impossible, we can control the temperature of dough by using:
- A desired dough temperature formula
- The same ingredients and measurements
- A proofer to control the dough proofing temperature
What is the best temperature to proof bread?
The professional dough proofer that I used in my supermarket days was set at 38C (100F). This was perfectly tuned for the dough to enter after kneading at 28C (82F) and be ready in 75 minutes. There was no first rise in these methods, as they followed a rapid dough rise method. The dough would warm throughout the proofing process and reach around 38C (100F) at the point it was ready to bake.
Artisan bakers prefer cooler temperatures as it produces more flavour as it benefits from extra fermentation, and as the length of time is extended, the gluten structure is naturally enhanced. A sweeter flavour is also derived. The best proofing temperature for artisan bread is around 25C (77F). However, many artisan bakers will proof their bread in a fridge overnight. The reasons why these temperatures are used is a complicated subject. Read the bread fermentation process post to learn more.
At home, try to leave the bread to rise in a warm place. For more flavoursome and slower bread, cooler temperatures are best. A dough thermometer is an absolute must if you want to level up your proofing skills. Here is the thermometer I use to probe my dough all the time.

How much does dough rise when temperature increases?
Yeast produces gas faster when it is warm. A simple rule to follow is for every 15F (8C), the rate of the rise doubles. It’s not an absolute rule as certain enzymes responsible for breaking down starch into sugars operate better at different temperatures.
How to proof bread with a dough proofer
By following the same recipe and taking temperature readings of the raw ingredients it’s possible to produce the same dough temperature each time we make bread. Yet one of the biggest variables is the temperature of the proofing environment. For consistency in the proofing time and quality of the bread, a proofer is used. Dough proofers found in commercial bakeries control the temperature and humidity in a proofing environment.
A proofer is the best way to prove bread, especially when baking all year round. These bits of kit are normally extremely expensive, however, home bakers can now pick up a small proofer suitable for home baking at a reasonable price. The Brod & Taylor proofing box is perfect for home baking and makes the ideal climate for proofing bread dough.
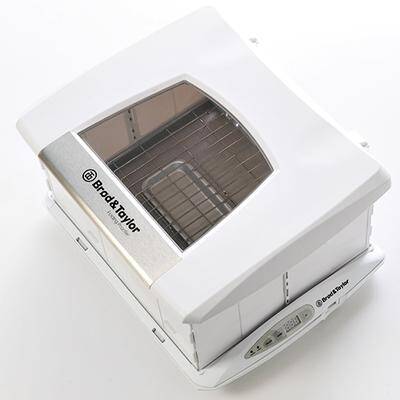
A proofer creates consistency in bread quality which is vital if producing loaves to sell. View the latest offers at Brod & Taylor, or see Amazon
How to proof bread without a proofer
Though having a proofer at home is great, many home bakers who don’t have one can still bake bread that’s awesome! If your proofing temperature fluctuates you will need to adjust your proofing timings when you are baking bread. This can be an adjustment of a matter of minutes or several hours! Temperature makes a big difference in the speed of the rise. It is best to find a warm spot in your home or make your own DIY proofing box with a heating mat.
Note: The dough fermentation process slows right down when it’s cold. At around 0C (32F) there is little yeast activity, but there are good reasons to proof dough in the fridge.
Benefits of retarding the dough
It’s common to final proof dough in the fridge. This method is typically used overnight for the bread to be baked the following day. In a commercial bakery, it means that the baker has more bread to bake early in the morning. This benefits the baker by not having to start work earlier and customers can enjoy a wider range of products at the start of the day. The process is called “retarding” or a “cold start”.
When the dough is retarded, gas production slows right down, yet the structure of the gluten is enhanced. This produces a better crumb structure which benefits gas retention properties. When retarding, starch particles in the flour continue to break down into sugars to produce more sugars. This produces a sweeter flavour and more caramelisation in the bread after baking. You can use an overnight fridge proof with the beginner’s bread recipe if you wish.
I prefer to store my dough in the fridge during the first rise instead of the final rise, but many other bakers do the reverse. Give it a go and see what you prefer!
How to proof bread dough in the fridge
Once the shaped dough is placed in a bread proofing basket, tin or tray, cover it with a bag or lid. Now you have a couple of options:
- Allow the dough to rise halfway at room or warm temperature. Then, put it in the refrigerator overnight. It will be ready to bake the next morning, but if it hasn’t fully risen, take it out of the fridge while you warm up the oven or a little longer.
- Place the dough straight in the refrigerator after shaping and leave overnight. The next morning, remove it from the fridge to warm up. Proof at room temperature or in a proofer until it is fully risen and then bake. The usual amount of time this takes is around 3 hours.
The time a retarded dough takes to rise is dependent on:
- The temperature of the fridge
- The temperature of the room or proofer
- The temperature of the dough when it is shaped
- The size of the dough piece.
Note: The poke test does not work on a retarded dough. You must use the doughs growth to tell when it is ready to bake.
Do you need to let the dough warm up before baking?
It is not necessary to warm up dough that has risen in the fridge but not doing so can lower the quality of the bread. Expect less oven spring, a more compact crumb and a harder crust if you bake cold dough. Having said this, if a well-developed dough is used, the difference can be negligible.
Small diameter bread types are much more forgiving for overnight proofing than larger bread loaves.
What bread can I rise in the fridge?
Generally, I advise against anyone final proofing large-sized bread in the fridge. The core of the bread takes longer to acclimatise. This means that when the dough goes in to cool, the centre of the dough will continue to be active for a while. When the cold dough is taken from the fridge, the core remains cold. This can:
- Lower the amount of oven spring
- Produce an uneven crumb structure
- Underbake the inside yet burn the outside
- Make dense bread.
Small diameter bread varieties such as baguettes or crusty rolls are great to overnight retard as the centre of these types of bread warms quickly.
Any small bread dough that’s lighter than 650 grams can be proofed overnight. Larger sizes of bread can deteriorate during baking after a cold final rise, so are best risen at warm temperatures. If you want to retard large dough pieces for their final proof, rise it to 50-75% proof and then put it in the fridge.
As I tend to make larger loaves at home I prefer to bulk ferment in the fridge overnight. In the morning, I’ll warm the dough for an hour or two before final shaping and proofing.
How to proof bread when it’s cold
Baking when it’s cold outside slows down the whole process. Here are a few adjustments that will help:
- Warm the temperature of the water used in the dough
- Store the flour in a warm area
- Use a proofer or warm place to warm the dough
- Allow more time to bulk ferment and proof
Proofing box alternatives
If you don’t have a proofer there are many ways that you can warm your bread up when rising. You can proof the bread in an oven or microwave by turning just the light on to raise the temperature. Other ideas include above a radiator, in an airing cupboard or any warm spot. Some bakers manage to proof bread in a slow cooker! I built a DIY proofing box using a heating pad. It is my favourite solution at the moment!
When is bread ready for the oven?
The final rise will come to an end when the yeast cells run out of available sugars and cannot continue to raise the dough. At this point, plenty of gas should have been produced, and the bread is roughly double its original size. We often measure the final proof as a period of time, but a proofing timetable is just a guide. Learning when the dough is ready to go in the oven by inspection makes much better bread!

Professional bakers know when the bread is ready by looking at the size of the dough. By using the same recipes and conditions the baker can determine when the bread is ready to bake by looking at the height of the dough in the tin.
The best way to tell if dough is ready to bake is to use the same recipe, proofing tin/basket, dough temperature, mixer timings etc. every time. If you don’t have much experience, are trying out a new recipe or are baking at home, the “poke test” is just what you need!
How to use the poke test when baking bread


To find out if your bread is ready to bake, use the finger poke test. It’s a tried and tested method used in bakeries across the world. It will show if your yeast has run out of food. To do this:
- Wet your finger by running it under a tap
- Use your finger to poke the surface of the dough by 3-4 mm and as soon as you feel the dough start to dent, pull away.
- After removing your finger an indent will be visible. If the indent remains after 3 seconds the dough is ready to bake.
- If the dough pops straight back up, it needs more time.
Poke test tips:
- You can work out how close the dough is to being fully proofed by how long it takes for the indent to spring back. If it stays down for 1-2 seconds it’s nearly ready. If it pops straight back up, it’s way off.
- The indent can remain after baking so don’t poke too deep or too often. If you think that your dough is over-proofed, just bake it, don’t poke it. Craters left from pokes are more likely to remain in over-proofed bread.
- The poke test does not work too well if the dough is cold as the yeast is less active.
How to proof baguettes
Baguettes, like ciabatta, are traditionally proofed in a cloth called a couche. The liner is dusted with flour, a baguette is placed on the liner and its edges are folded up along each edge to form a barrier between the next baguette. Once proofed (which typically takes around 90 minutes), the baguettes are removed with a baker’s peel and placed on a board. The baguettes are then scored and slid into the oven with steam.

Instead of a couche, a metal baguette tray can be used to make baguette moulée. The mould is used to proof and bake the baguettes so it’s great for beginners!
Can dough rise too much in bread baking?
The dough becomes over-proofed when the dough can no longer retain gas in its structure. This is due to (usually) a combination of:
- Gluten becomes stretched too much and tares
- Lactic acid levels increase over time which breaks down gluten
- The yeast runs out of sugars it can consume in the flour so begins to digest gluten
- With more exposure to air, the dough is over-oxidised which destroys the taste and aroma of the bread
When a dough starts to display these characteristics it is known as over-proofed. When baking over-proofed bread it can lead to the weakened gluten structure collapsing as the dough becomes too heavy to hold its own weight. In milder cases of over-proofing, expect to see irregular air bubbles in the crumb or a loaf that spreads sideways instead of upwards as it is baked in the oven.
How to tell if the dough is over-proofed?

If using the finger poke test, the dough will stay indented for more than three seconds. You will also see thin air bubbles appear on the surface of the dough. This is where the extra gas is trying to escape and works its way through a weak route in the dough to stretch a random gluten pocket.


Bread is more likely to end up over-proofed if there has been a long first rise. Many bakers do a bulk fermentation poke test to see if their entire batch of dough is ready for shaping. However, watching the volume gains of the dough, how gassy it becomes and using the windowpane test to check for gluten development are more accurate solutions.
What should I do if my bread is over-proofed?
If you notice any signs of over-proofing, bake it quickly! It is better to underproof than over-proof. In the worst case, under-proofed bread will be slightly inferior, but if you do over-proof, you might have to start again!
Can I bake bread that is under-proofed?
For some types of bread, it’s actually better to bake them when the dough is slightly under proofed. A lower amount of gas development in a well-built gluten structure will often benefit from a larger oven spring if the dough is slightly under proofed. Providing the bread is scored correctly, the oven spring will open up the cut further.
To get an ear on sourdough bread you’ll underproof the dough slightly. A tin loaf such as a sandwich bread will often have a short bulk fermentation period and a 1-2 hour final rise and enter the oven slightly under proofed. When using the poke test, look for an indent to spring back in 2 seconds instead of 3 to slightly underproof.
Proofing whole wheat bread vs white bread
Wholemeal flour contains proteins and starches that are more complex than those found in white flour. The starches take longer to break down into simple sugars and the proteins need longer to hydrate and turn into gluten. As complex whole grain flours cannot be fermented by the yeast quickly, the bread takes longer to rise.

It also means that the oven spring is less explosive in whole wheat bread. This is why there is no need to score whole wheat bread before baking. Slashing dough lets gas escape. If a whole wheat dough is scored before baking, a lower oven spring volume is probably.
An underdeveloped wholemeal dough can also be a problem. It can lead to erratic holes in the crumb, a dense crumb and sometimes both. A perfect whole wheat loaf is harder to achieve than a white loaf as it’s less forgiving when the proofing is over or under-done.
Frequently asked questions about proofing bread dough
If you’ve enjoyed this article and wish to treat me to a coffee, you can by following the link below – Thanks x


Hi, I’m Gareth Busby, a baking coach, senior baker and bread-baking fanatic! My aim is to use science, techniques and 15 years of baking experience to make you a better baker.
Table of Contents
- Bulk fermentation vs the second rise
- How long should the final proof last?
- What is the best temperature to proof bread?
- How to proof bread with a dough proofer
- How to proof bread without a proofer
- Benefits of retarding the dough
- How to proof bread dough in the fridge
- Do you need to let the dough warm up before baking?
- What bread can I rise in the fridge?
- How to proof bread when it’s cold
- Proofing box alternatives
- When is bread ready for the oven?
- How to use the poke test when baking bread
- How to proof baguettes
- Can dough rise too much in bread baking?
- How to tell if the dough is over-proofed?
- Proofing whole wheat bread vs white bread
- Frequently asked questions about proofing bread dough


