

Are you kneading for so long that your arms ache? Feel that you’re making no impact no matter how long you knead your dough? Or not passing the windowpane test? Well, in this article, I will share loads of kneading knowledge with you. These tips have been learned through experiments, experience and reading up on the science of kneading. We are going to cover:
- When to use the windowpane test
- Gluten development percentages
- What it takes to pass the windowpane test
- What to do when dough is not passing the windowpane test
I’ll also be throwing in some of my tried and tested kneading tips you might not have heard before. Sound good? Let’s begin.
When to use the windowpane test
You might be having problems passing the window pane test because you are doing the test at the wrong time. The windowpane test is used to determine the level of gluten maturity. When kneading, the test is used to tell when to finish kneading. Suppose you split proofing into a first (bulk) and second rise (after shaping). In that case, the windowpane test is used during the first rise.
What’s important to grasp is that the gluten will naturally develop as it rests during bulk fermentation. When kneading dough to be bulk fermented for several hours (before its final proof), you shouldn’t be aiming to pass the windowpane test entirely. Instead, the gluten can be underdeveloped at the end of kneading as it continues to mature as it bulk ferments.
TIP: When ready to test your dough, remove a portion of it for the test. Leave the removed segment to rest for a minute or two, and then perform the windowpane test by stretching it. The rest gives the gluten time to relax, which is necessary for the gluten to stretch effectively.
Explaining gluten development percentages
Instead of saying the windowpane test is a “Pass or Fail”, it’s better to review gluten development as a percentage. This allows us to target specific maturity levels and keeps us motivated when kneading, as you can see a gradual improvement!
When gluten is fully developed, it will stretch incredibly thin and long. This is where you would have said it “passes” the windowpane test, but not anymore! Now you will call it 100% gluten development.
Gluten development reaches 100% when it can’t improve anymore. In fact, if it is kneaded or left to ferment for longer, the gluten would degrade! This is another reason you shouldn’t be kneading to 100% gluten development if a long bulk fermentation period follows.
Do I need to pass the windowpane test when I knead dough?
As gluten continues to mature during bulk fermentation, it would be incorrect to aim for 100% development at the kneading stage. The only way is down after this point! Therefore, the dough must be shaped when it reaches full gluten development. Stretch and folds can be added during bulk fermentation to develop the gluten matrix faster. The ambition is for 100% gluten development and the required gas production level (height of the rise) to occur simultaneously. When these factors appear, the first rise ends, and the dough is shaped.
Aim for 100% gluten development at the end of kneading for quick-bread that only rises once. For long-fermented bread doughs such as sourdough (or overnight bulk fermenting in the fridge), 20-30% development is all that is required. The long bulk rise and stretch and folds will work the gluten instead.
For bulk fermenting times of say 2-4 hours, gluten development will be somewhere in between, say 60-80%.
| Stage | Gluten development | Features | Visual |
|---|---|---|---|
|
Stage 1 | 25% | Dough breaks when lightly stretched. | 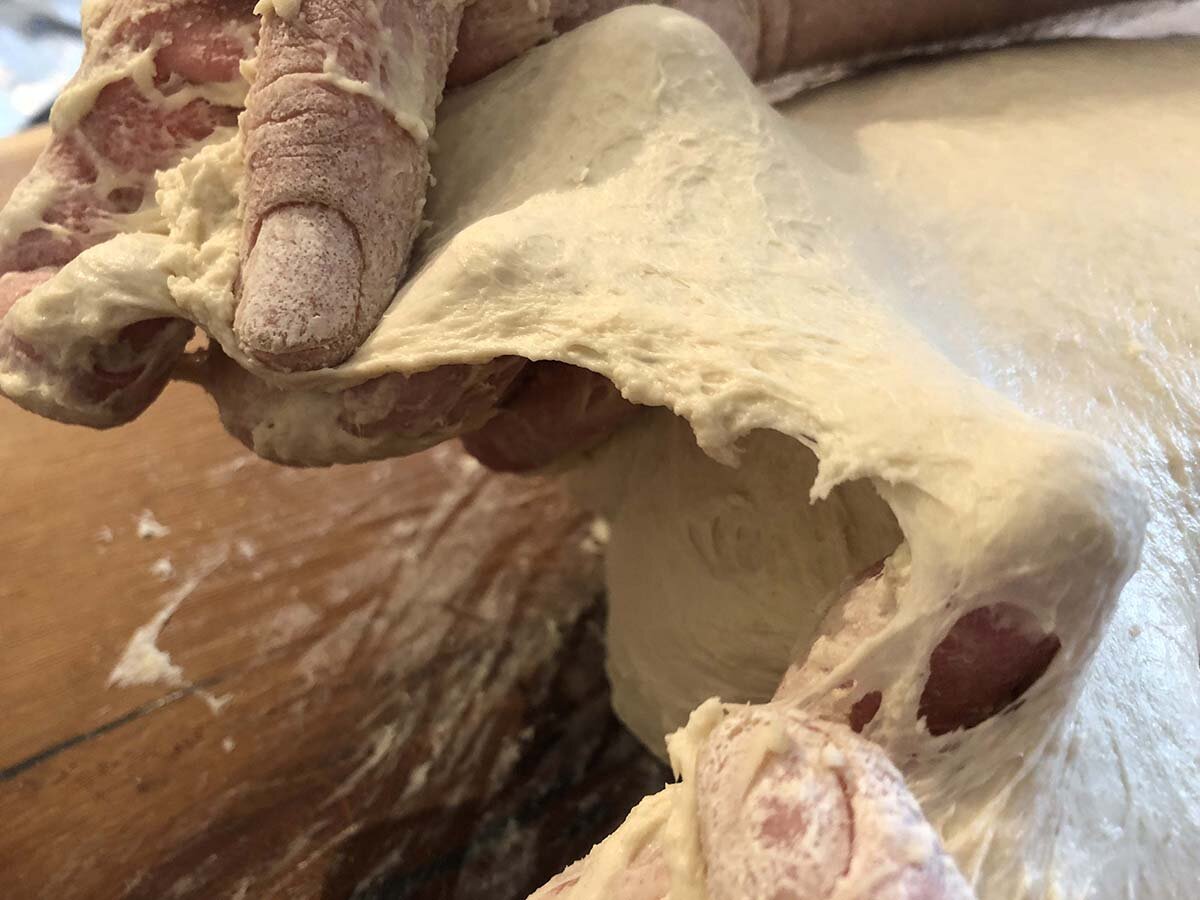 |
|
Stage 2 | 50% | Dough has a small amount of stretch (1-2 cm) before it tears. |  |
|
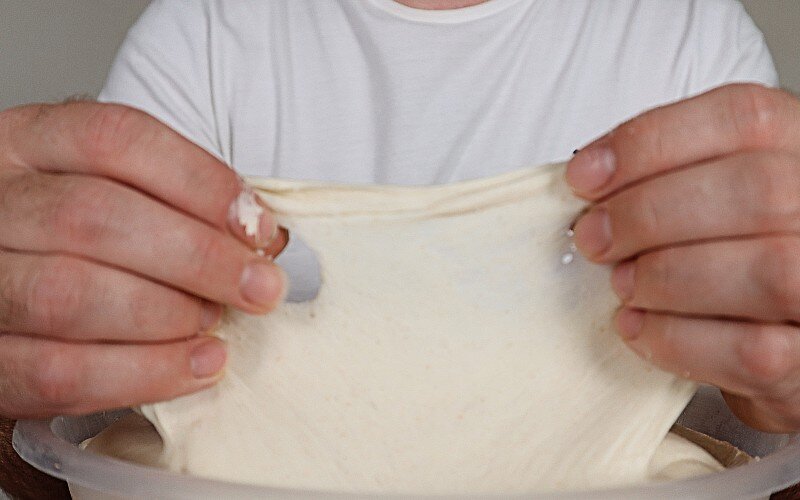
Stage 3 | 75% | Stretches 2-3 cm before it tears. |  |
|
Stage 4 | 90% | Stretches thin to 5-8cm without tearing. Remains opaque when held up against a light. |  |
|
Stage 5 | 100% | Stretches thinly and allows light to shine through when held up. | 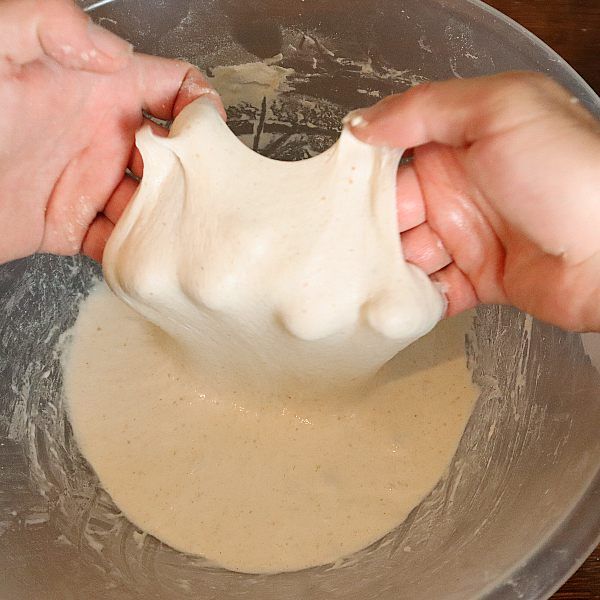 |
Why is passing the windowpane test important?
Reaching 100% gluten development at the time of shaping is essential to making the highest quality bread. At this moment, the dough is at its peak capability to retain gas. This produces bread with a higher rise and a more uniform crumb network.
Is passing the windowpane test essential?
If your dough has risen enough so that it is ready to shape but doesn’t pass the windowpane test, it can still make decent bread. The best thing to do here is to settle with what you have and attempt some of the tips in this guide next time you bake. It’s not vital that you reach 100% gluten development, but you’ll make lighter bread with a crisper crust if you do.
Why is my dough not passing the windowpane test?
Take a look at the following reasons why your dough is not passing the windowpane test. Afterwards, check out my tips at the bottom of the page.
#1- You’re checking at the wrong stage
If your dough is to undergo bulk fermentation, it won’t (and shouldn’t) pass the windowpane test during kneading. Use the windowpane test throughout bulk fermentation to check how the gluten structure progresses.
#2- Let the dough rest a minute
As gluten is kneaded, it becomes tense -it’s getting knocked around a lot, so wouldn’t you be? Anyway, the issue is notable when you try to stretch it out. You’ll find it very difficult to stretch out thin. The tendency here is to keep kneading, which can be unnecessary.
The solution for an accurate test is to tare off a piece of dough and leave it to relax. You can carry on kneading the rest of it if you wish! After a minute or two, use the windowpane test on the trimmed piece. You’ll find it stretches much easier!
#3- The dough has not been kneaded enough
The most obvious reason for an underdeveloped gluten matrix is not kneading enough. You might also see a benefit in changing your technique of kneading your dough. Here are my top tips for how to knead dough:
Split hand kneading into 3 stages
Instead of working the dough at full pelt and burning out, use a slower kneading method to start with. This will fully hydrate the gluten proteins to produce a more robust gluten matrix.
To do this, gently mix to incorporate the ingredients at first. Then, hydrate the wheat by using long stretching motions. For the final stage, move to a more aggressive action halfway through.
Use a timer
Use a timer to track how long you are kneading. Hand kneading can be strenuous, especially when it’s a new skill. I’ve always noticed that I lose all concept of time when kneading, so I find a timer handy to keep pushing on. Here’s the simple timer that I recommend.
How long should I knead dough?
Dough should be kneaded for at least 8 minutes in a dough mixer or around 15 minutes by hand. See how long should I knead dough for more detailed analysis and examples.
Don’t add flour when kneading
Any extra flour added to the kneading surface disappears into the dough, so you might as well include it in the recipe! If you add extra flour, the dough will be more inflexible, and the bread will likely be crumbly. The temptation can then be to add more water to counteract this, but what about the yeast and salt? See where I’m going with this. Don’t add extra flour unless it’s a last resort!
Keep temperature under control
Kneading dough transfers warmth and raises the temperature of the dough. As it warms, the yeast becomes more active. The result is a gassy dough whilst trying to knead! Most bakers will prematurely end kneading as it’s too hard to continue. Make a Final Dough Temperature calculation to prevent this from happening. By adjusting the temperature of the water before weighing, you can cool or warm the kneaded dough. If you don’t already have a temperature probe, I recommend this probe by GT Dealer.
TIP: Try to reduce contact with the dough as much as possible when kneading. It's a hard ask, I get it, so switching up your kneading method from time to time. It can get exhausting if using the same technique for ages!
Don’t worry about over-kneading by hand
It’s impossible to over-knead bread dough when hand kneading!! If you hand knead for ages, the worst that can happen is the dough becomes warm and gassy. It’s very easy to notice this. Only at this point should you stop.
Stand mixer problems
One of my first posts here on Busby’s Bakery School was a test on stand mixers. No matter how long I kneaded dough in my Kenwood, all that happened was it warmed up. The gluten didn’t develop properly, and the bread collapsed in the oven. Every time!
This issue is quite familiar with many domestic dough mixers. It could be why your dough is not passing the windowpane test. The solution here is not to mix for 40-45 minutes – (it doesn’t help!). Instead, keep mixing time below 20 minutes and try bread recipes with longer bulk fermentation periods. Otherwise, hand knead or upgrade your mixer.
#4 -The dough needs more fermentation activity
Dough benefits from organic activity to mature its gluten structure. This activity, produced by yeast or acidic fermentation, produces natural dough conditioners. There are many elements of the bread fermentation process. The main factors that improve regarding gluten are:
- Enhanced gas retaining properties
- More extensibility
- Stronger gluten bonds
The benefits of these are:
- More defined crumb structure
- Crustier crust
- More volume during proofing and oven spring
- Lighter, aerated crumb
To receive these benefits, a solution is to use a long bulk fermentation period. Another method for short bulk fermentation methods is to prepare a preferment such as a biga the night before making the dough. A biga contains fermented flour, which, when added to the dough, matures it and reduces the time required to bulk ferment.
#5 -The dough needed more or less water
For the gluten strands to stretch, they need the correct level of hydration. Too little water restrains the ability of the gluten to stretch. Too much water can get in the gluten’s way and weaken the bonds and dough structure. Organic acids that occur during fermentation increase the capabilities of the dough to retain water and improve cohesiveness. If the dough is wet, increase bulk fermentation duration.
#6 -There is not enough gluten in the flour
If making short/zero bulk fermentation bread, you will be looking for 100% gluten development at the end of kneading. To achieve this, the flour must have a high protein content, around 13%. For a longer bulk fermentation, weaker flours can be used. As the damaged proteins contained in every flour will repair.
Whole wheat flour requires more water to make an adequately hydrated dough. The bran it contains is slower to absorb water than white flour. This means it takes longer to form a gluten structure. Whole wheat flour has a higher percentage of protein than white flour. Yet, despite this, its gluten proteins are less accessible. This makes it harder to develop a strong gluten network. To counteract this, you can cut the whole wheat flour with strong white flour, add vital wheat gluten, or soak the whole wheat flour before kneading.
#7- The dough contains too much fat or sugar
Fat and sugars protect the gluten strands during kneading. They prevent gluten from reaching full development. To fix this, delay the addition of solid fats and sugars until towards the end of kneading. This allows much of the gluten structure to form before the extra ingredients are added.
Looking for a simple recipe to improve your baking skills? Try my beginner's bread recipe.
Tips to accelerate gluten development
Prefermented flour
This is my preferred solution to enhancing the gluten structure. It is compelling in quickly-fermented bread doughs that are kneaded by hand. Preferments introduce organic acids and hydrated flour to the dough. This provides an essential boost to the gluten, which is quicker to reach maturity.
Remove 30% of the flour and combine it with an equal quantity of water and a pinch of yeast. Leave the mixture to sit overnight. Once it has doubled in size, add it to the rest of the ingredients and knead. Be sure to remove the flour and water used in the preferment when weighing the ingredients the following day! The preferment will also leaven the dough, so you’ll want to use less yeast in your recipe too.
Autolyse
Soaking the flour and water for 20-30 minutes (sometimes more!) before mixing is a great way to hydrate the flour. Also, during the autolyse, enzymes are activated to break sugars and proteins down. These combine, and the result is that less kneading is required.
Use the fridge when hand kneading
It’s normal for your arms to tire when kneading by hand! To compensate for this, place the half-kneaded dough into a mixing bowl, cover and chill. Leave it in the refrigerator, and whilst your hands recover, the dough continues to mature. After 5-10 minutes, the dough is then removed and kneading can recommence. It’s much easier this way!
Lecithin
Lecithin can be found as a dough improver. It is also naturally found in eggs, vegetable oil and soy flour. A small amount helps to emulsify the dough into a stronger structure. The result is a dough that’s easier to knead and passes the windowpane test.
Ascorbic acid
Ascorbic acid strengthens the gluten bonds by oxidising the flour. This aids the development of gluten. Use at a tiny amount, 0.02% – 0.04% of the weight of the flour used, and only in short fermented bread doughs.
Vinegar
A touch of vinegar when bread baking also aids gluten development.
Upgrade your mixer
Consider upgrading if you’d rather use a mixer to do all the work. Select a powerful mixer designed and rated by bread bakers such as the Ankasirum or a Hobart.
Stretch and folds
Stretch and folds can be applied to the dough during bulk fermentation to develop the gluten.
What to do when dough is not passing the windowpane test?
Using the fridge during bulk fermentation is a common solution. Chilling the dough slows yeast activity, allowing the dough’s natural gluten development to catch up. Leave it for a couple of hours or even overnight to mature. The dough will need to be fermented at room temperature for some time so the yeast can ferment.
Ending thoughts
Well, that’s pretty much all of my insights on kneading! We’ve covered when you should be using the windowpane test, how to use it and how to improve your kneading. You might also find the bulk fermentation article interesting as it shows you how to manage gluten development during the first rise. I hope you’ve found this post helpful. If so, please leave me a comment below to say how it has helped you. Don’t be afraid to ask any questions down there too!
Frequently asked questions about kneading dough
If you’ve enjoyed this article and wish to treat me to a coffee, you can by following the link below – Thanks x

Comment
Leave a Reply

Hi, I’m Gareth Busby, a baking coach, senior baker and bread-baking fanatic! My aim is to use science, techniques and 15 years of baking experience to make you a better baker.
Table of Contents
- When to use the windowpane test
- Do I need to pass the windowpane test when I knead dough?
- Why is passing the windowpane test important?
- Why is my dough not passing the windowpane test?
- #1- You’re checking at the wrong stage
- #2- Let the dough rest a minute
- #3- The dough has not been kneaded enough
- #4 -The dough needs more fermentation activity
- #5 -The dough needed more or less water
- #6 -There is not enough gluten in the flour
- #7- The dough contains too much fat or sugar
- Tips to accelerate gluten development
- What to do when dough is not passing the windowpane test?
- Frequently asked questions about kneading dough


Thanks for this article! I mixed a brioche dough tonight and cannot get a windowpane. I’ll do one more simple SnF, then refrigerate. See what I have in the morning.
Perfect, let me know how it works. Brioche is usually tough to reach the windowpane during bulk fermentation as the fat content is so high. I get best results when I knead the dough well before adding the butter at the end.