
How To Make Whole Wheat Bread Less Dense

Years ago, I wrote an article on how to fix dense bread, which mainly covered white bread (you can see it here: how to prevent dense bread). So after a few years, instead of continuing to expand the article to include every type of bread and solution, I thought it was time for an article specifically about how to make whole wheat bread less dense! So if you are frustrated with whole wheat bread turning out dull, dense or quickly becoming stale, this article will help.
I’ve broken this write-up into 4 sections. The first explains why whole wheat bread can be so dense. The second is a collection of tips to make lighter bread with whole wheat flour. The third is a bread recipe that utilises the tips shown. And finally, a list of ingredients you can include to improve your health-conscious loaves. If this sounds good, let’s get cracking!
Why is whole wheat bread always dense?
Bread becomes dense because of two core faults; 1) a lack of gas production or 2) a lack of gas retention.
Gas production: This fault can be alleviated by increasing the amount of yeast and/or sugars, warming the temperature or a longer proofing time. These fixes will produce more gas so that it can be captured in the dough’s gluten network.
Gas retention: Once the yeast creates the gas, it’s then the dough’s job to capture the gas so it can rise. This role falls to the protein in the flour, and for wheat flour, it’s gluten proteins that form the dough’s structure and capture the gas. The principle of gas retention is that the gluten structure is strong and stretchy to retain most of the gas produced. If the gluten structure isn’t up to standard, gas seeps out of the network, and the yeast has to create more gas. What commonly happens with dense bread is that the yeast runs out of the sugars in the flour, forcing the rise to end prematurely. The result is dense bread.
Capturing the gas produced by the yeast is a more challenging problem when making bread with whole wheat flour than white flour. Whilst whole wheat flour often contains more protein than white flour, it takes longer for the gluten proteins to become hydrated and stretch. Starch (chains of sugars) are also more complex in whole wheat flour, making them slow to break into sugars. This slows the rate at which sugars are passed to the yeast, slowing gas production in the early stages of proofing.
How to make whole wheat bread lighter at home
To make whole wheat bread less dense, we can take many steps to maximise our dough’s ability to retain and produce gas. Here is what you need to know:
Tip 1: Understand your flour
You want to be confident that your flour can make a decent loaf of bread. Whole wheat flour qualities vary dramatically between producers and even batches of the same flour. It really helps to understand the type of flour you have and how best to work with it. Here are a few key points:
Milling technique
Flour that’s been milled using a stoneground mill will contain the whole of the grain and have a large particle size. Some mills may sift out some large pieces, but not always. Modern roller mills separate the wheat, then return bran and germ at a ratio they see fit. Fresh, home-milled flour contains the whole of the wheat berry but less uniform particle size and won’t be aged. See my guide on baking with freshly milled flour to learn why ageing flour is essential.
Protein content
The majority of the protein in wheat flour is gluten. Once hydrated, gluten strands unravel, and existing bonds between strands break, allowing the strands to rebond with nearby strands once in their straighter form.
Kneading dough accelerates the hydration of the gluten and the breaking down of existing bonds. An enhanced gluten network is formed, although the process will occur (at a slower rate) as moist flour is left untouched.

The amount of protein in flour is a good indicator of how much gluten it contains. Put simply, the more gluten flour contains, the more bonds can be created and the better the dough will be at capturing gas. As most of the protein in flour is gluten, we can pretty much tell how much gluten is in flour by looking at the percentage of protein on the packaging, but this isn’t the only factor to consider.
In whole wheat flour, gluten is less accessible than in white bread flour, meaning it takes longer to hydrate and form an effective gluten structure. The bran in whole wheat flour also weakens the gluten structure as its sharp edges pierce the gluten strands and offer no binding benefits. As whole wheat flour soaks up more water, the extra weight reinforces the need for a more robust gluten structure. It’s, therefore, necessary for whole wheat bread flour to contain more protein compared to white flour to produce lighter bread.
Gluten type
Whilst most of the protein found in bread flour is gluten, other proteins are available, and more than one type of gluten. Gliadin gluten proteins allow the dough to stretch without tearing. Glutenin gluten proteins hold the structure together to make the dough more elastic. Both types of gluten are essential for the dough to be shaped and hold shape during proofing. Other proteins will either act as enzymes (catalysts for breaking down flour into smaller parts) and others offer binding benefits to support gluten.
The balance between the two main gluten types and the other proteins in the flour will determine how your dough will perform. This information is not declared on the label of most flour types. However, flour mills sometimes publish this information on their websites. Otherwise, use flour from a reliable source.
Colour
The colour of the flour is a good indicator of how much bran is in the flour. The dark brown colour indicates it contains more bran and a whiter one. Whilst bran is the healthiest part, too much prevents the gluten from being able to form extended, stretchy networks. The result is bread with a compact crumb that, at worst, can become dense and gummy.
Particle size
Check the flour is not too coarse. It’s usual for stoneground flour to have a larger particle size. If this is the case for your flour, you’re at risk of large flakes of bran piercing holes through the gluten and bursting the pockets of air. You’ll need to soak your flour before kneading to produce quality dough, more on soakers later.
Of course, these characteristics aren’t resolute. The size of the wheat berry, growing conditions and the wheat type impact the flour’s quality. So, while many bakers go straight to checking the protein content of the wheat, there are many other factors to consider
Tip 2: Get the best out of your whole wheat flour
If your whole wheat flour is:
- Light coloured – not too much bran
- Even in particle size
- Soft and light
- Over 12% protein content
You should be able to make good bread without any tweaks. But if not, you have a few options to consider:
Cut the flour: If the wheat is very dark with a lot of bran, the fastest solution to make great bread is to swap a percentage of the whole wheat flour for white bread flour. Including white flour makes it easier to develop the superior gluten network necessary to make light bread. Start with (say) a 30-70 ratio split of whole wheat to white flour. Later, as you grow in confidence, you can increase the percentage of whole wheat flour. This is my preferred method and the one I follow in the recipe.
Add more gluten: A popular “cheat” for home bakers is to add Vital Wheat Gluten to the flour. The extra gluten will trap more gas to assist its gas-retaining capabilities.
Sift the flour: Alternatively, sifting whole wheat flour removes many of the large pieces of bran.
Tip 3: Allow time for the gluten to unwind
When combined with water, the gluten proteins must absorb the water before unraveling. As the proteins in whole wheat flour are less accessible, the soaking period takes longer than in white flour.
Complex starches are common in whole wheat flour. These will need to be broken down into sugars by enzymes found in the flour and yeast. This breaking down process takes time, so the yeast’s respiration process begins slowly until enough sugars are available and yeast activity can take off. There are three approaches to dealing with this:
- As gluten needs time to soak before it’s intensely kneaded and gas production begins slowly, one approach is to lightly knead the dough and let it undergo an extended maturation period before shaping and rising for a final time.
- Slowly knead your dough for several minutes before increasing the intensity to develop the gluten.
- Mature the flour before adding the rest of the ingredients by using an autolyse, soaker or creating a preferment.
Soaking the flour
Soaking whole wheat flour with water (equal weights of water and flour) for 2-4 hours unlocks a whole bunch of aromatic flavour and provides enough time for the flour to soften. If you split the whole wheat flour with white, 30:70, as I suggested, soak all of the whole wheat flour, then after soaking, add it to the white flour and remaining ingredients (minus the amount of water used in the soaker) to be kneaded.
The autolyse method is a popular choice when dealing with whole wheat flour, as it not only matures the flour before kneading but also improves the gluten’s extensibility. Learn more in my autolyse guide or sourdough autolyse guide. Here you’ll soak all the flour with the water specified in the recipe for around 20-60 minutes. After the autolyse is complete, the salt, yeast and remaining ingredients are added, and the dough is kneaded.
Another method is a preferment such as a poolish. I will cover this in detail later on, but it’s a mixture of flour, water and a small amount of yeast left overnight to mature.
Tip 4: Develop the dough structure
Capturing as much gas as possible is crucial for making light bread. For the gluten to retain gas effectively, it must be well-developed when the dough is shaped. As the dough rises in its banneton, tin, tray, or whatever proofing device you use, the gas produced will inflate the gluten structure.
You may have come across the windowpane test. If not, look at what many would describe as the “perfect dough” in the image below.
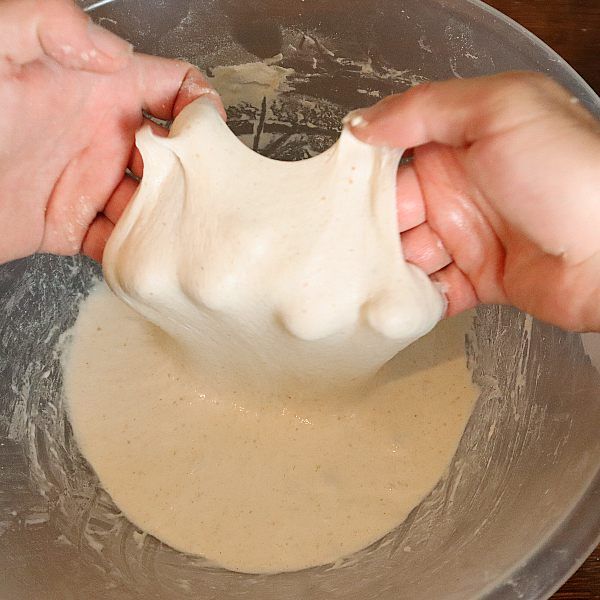
At this point of development, the gluten is at its stretchiest and ideal for capturing gas. But achieving this level of gluten development with whole wheat dough is tricky. In fact, it’s so hard that I rarely succeed by hand kneading alone. The bran, weaker protein and extra fibres in the flour make it far from easy to reach 100% gluten development, so don’t worry about not achieving this. What you should be able to get is a dough that looks like this:
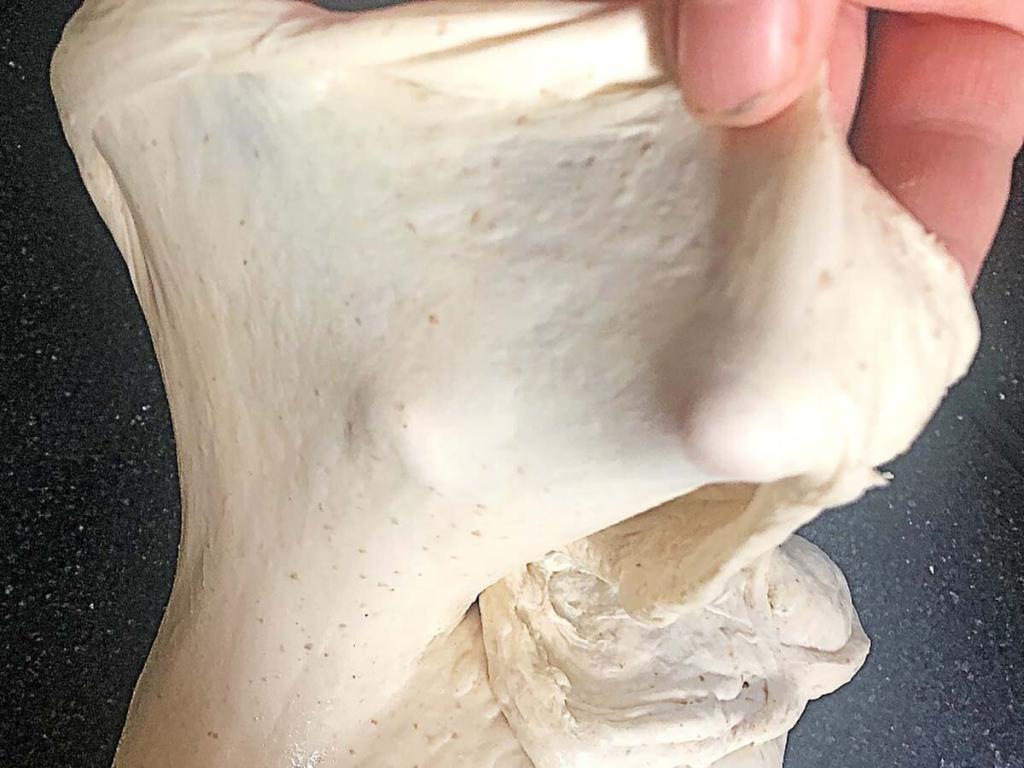
To develop structure in a whole wheat dough by hand, you’ll need to take care when kneading. Here is an approach I use that utilises a poolish and a double rise:
- Allow plenty of time (autolyse/soaker/preferment) or gentle kneading for the gluten to hydrate before it’s kneaded aggressively.
- Knead for a medium duration, about 10 minutes by hand (or 7 minutes in a dough mixer) and achieve 30-50% gluten development.
- Allow the dough to rest during the first rise of 2-4 hours.
- Agitate the dough during the first rise by using stretch and folds to accelerate gluten development every 30-45 minutes.
- End the first rise once it has risen 50%. At this point, the gluten should be mature enough to look like the first image above and pass the window pane test.
Note: An alternative option to a preferment/soaker is to gently knead the dough and store it in the refrigerator overnight to mature. Stretch and folds can be applied in the morning if more gluten development is required.
Tip 5: Increase organic activity in the dough
Not only is the first rise, or bulk fermentation as it’s also known, necessary for the gluten structure to develop, but it also matures the dough. During the first rise, the dough benefits from fermentation activity. This is the activity the yeast undergoes when it has a supply of simple sugars in low oxygen levels.
When fermenting, yeast releases carbon dioxide and ethanol alcohol. The alcohol adds a warmth to the flavour of the bread whilst also helping it stay fresh and resist mould growth.
Lactic Acid Bacteria are cultivated in sourdough starters in partnership with wild yeasts. If a yeasted dough is left for several hours, Lactic Acid Bacteria (LAB) will also begin to multiply. These also ferment sugars in the flour, producing lactic and acetic acid, vinegar and more carbon dioxide. The outputs from fermentation provide natural conditioners to improve:
- Gluten stretch
- Gas retention
- Gluten elasticity
- Gas production (more CO2 produced)
- Extends freshness
- Flavour
So it’s worth allowing time for the yeast to ferment whole wheat dough before it is shaped. This means letting it rise around 40-50% during the first rise, provided you don’t over knead your dough, as this can lead to the gluten breaking and the dough collapsing.
Tip 6: Shape your dough gently
Shaping bread dough is a skill. Once you have developed some competency in shaping, the next big challenge is knowing how much gas to push out from the dough as you shape. If too much is removed, the yeast will run out of sugars and not produce enough gas in the second rise to properly raise it. If too little gas is removed, you will have large irregular holes running through your bread.
As mentioned, let your dough rise around 40-50% during the first rise. At this level, the amount you degas (the act of pushing out the air) isn’t as significant. Lightly or heavily, you’ll still end up with a decent loaf. The changes you make to the amount of gas removed can improve your bread, but it shouldn’t be “make or break”.
During the final rise, if you notice that the rise slows down near the end of the oven spring is particularly weak, you can either; 1) reduce the rising height during the first rise, to say 20-30%, or 2) be more gentle when shaping to retain more of the gas that exists.
There are other ways to alter your crumb, explained in the extra ingredients section later on, but these techniques are favourable and easier to manage.
Tip: If you notice lots of holes in your bread’s crumb after baking, remove more of the gas when shaping next time.
Tip 7: Manage humidity and temperature during proofing
Yeast activity is heavily dependent on temperature. The warmer it is, the faster yeast will work. If the proofing temperature drops below 20C (68F), yeast activity is much slower, and the proofing duration must increase dramatically. The ideal proofing temperature for artisan bread is around 24-28C (75-82F), although you can proof dough up to 38C (100F).
There are many ways to control temperature and humidity when proofing bread. I’ve written many articles about it, many of which can be found in the proofing and fermentation section. The easiest method to achieving control is to use a Brod & Taylor home-proofing box:
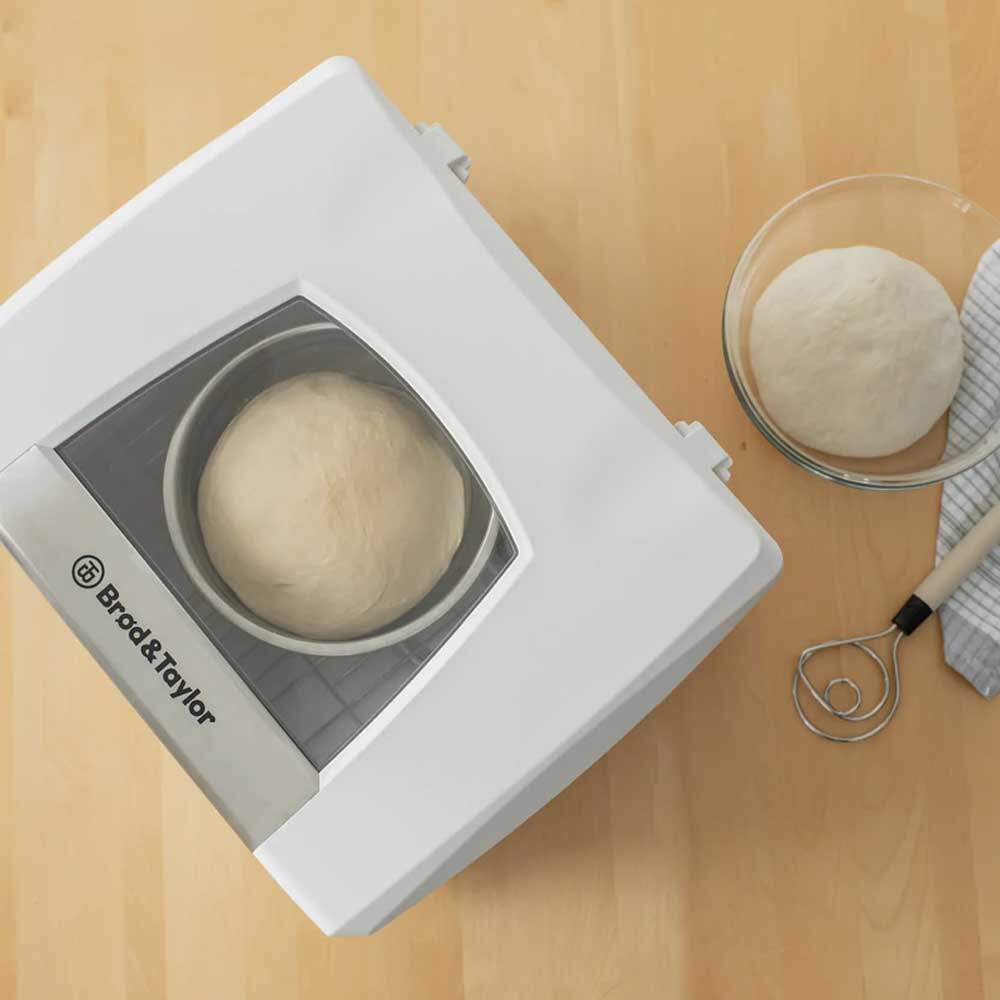
It’s the best solution for creating perfect proofing conditions, and also quite lucrative for me, so please buy a proofer using this link so I can get a commission! – You won’t pay any more.
Humidity is also important. Many professional bakers can adjust the amount of water in the air of the proofer, but you’re unlikely to achieve this level of precession at home. Water acts as a carrier between cells. Therefore a moist dough will rise more efficiently and faster.
At home, as long as there is enough moisture in the air that the outer edges of the dough won’t dry out, you’re ok. To achieve this, add a cup of warm water to your proofing area (the Brod & Taylor has a specific container for this), or you can cover your proofing dough with a bag or damp tea towel to keep moisture locked in.
Tip 8: Don’t underproof
If the dough hasn’t risen enough before going into the oven, the crumb structure will be more compact, the technical term for a dense brick! So don’t underproof your dough. By pressing it with your finger, you can use the “poke test” to tell if your dough is ready to bake. If the depressed area springs back straight away, the dough needs longer to rise. Once it stays for around 2-3 seconds, it’s fully proofed and ready to bake.
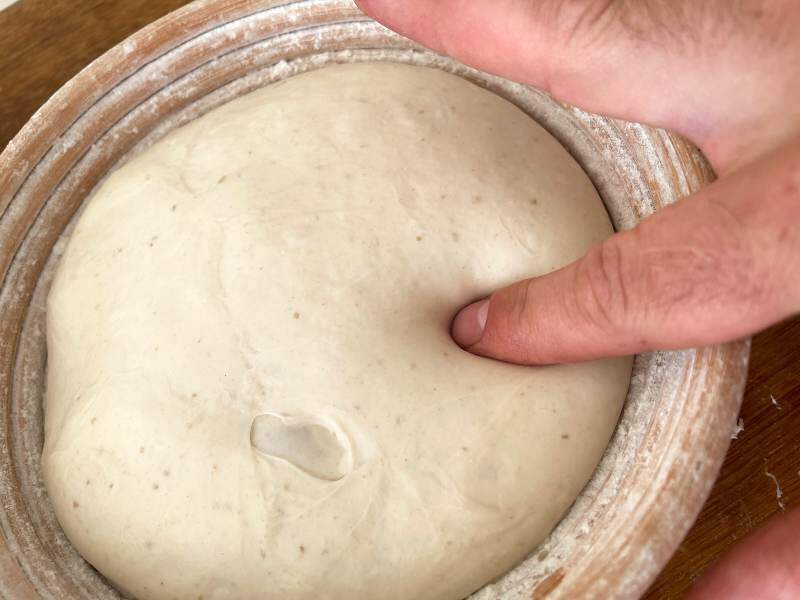
NOTE: The best way to tell if your dough is ready to bake is to know how high it should rise in your chosen proofing device (e.g. bread tin). Experience of proofing the same dough repeatedly will teach you how high it can rise, aiming for the maximum amount of gas in the dough before it collapses.
You’ll also want to not overproof either! Over-proofing can lead to the bread collapsing in the oven as the weakened gluten can’t support the extra weight of the dough. If you start seeing large air bubbles appearing on the surface of the dough, get it in the oven quick!
Tip 9: Your baking temperature and duration makes a big difference!
It’s sometimes under-egged, but how you bake your bread influences how light and fluffy it is. Before we get into the nitty-gritty of how to set up your oven, let’s just discuss moisture inside the bread.
When bread is baked quickly, more moisture remains in the bread. This softens the texture of the bread as it’s eaten, making it stay softer for longer. However, when excessive moisture remains, free water molecules accelerate starch retrogradation (the process of the starch crystallising, releasing water in the process) and make it easier for mould spores to multiply.
When bread is baked for longer, it becomes drier. Dry bread is more resistant to mould setting in but is less appealing after a couple of days as further moisture escapes.
Whole wheat flour absorbs more water than white flour, which means extra care must be taken during baking and cooling to remove moisture from the bread to prevent a moist and gummy crumb.
To make whole wheat bread less dense, bake your bread in a Dutch oven or on a baking stone. Hot oven temperatures produce bread with bigger oven spring. Aim to bake between 220-230C (430-435F!!) for 32-38 minutes if using a baking stone. In a Dutch oven, bake at 220-240C (430-450F) for up to 45 minutes.
Tip 10: Add steam to your oven
Adding steam to the oven extends the baking time by delaying the setting and hardening of the crust. This means your bread enjoys a more significant rise in the oven (oven spring). As the hardening of the crust is delayed by adding steam, yeast has more time to produce gas which expands the gluten structure to create a nicely aerated bread. Once the oven spring ends (about 15 minutes), steam is released from the oven to encourage the outer perimeter of the bread to harden into a crisp crust.
Baking bread without steam makes denser bread. However, as baking time is reduced, more of the moisture inside the bread’s core remains, making the dense bread soft and appealing. This is how soft bread rolls are made.
If you still have a problem with your baking setup, try my guide on improving an oven for baking bread.
Tip 11: Don’t score whole wheat bread
As the sugars in whole wheat bread take longer to break down, oven spring is less rapid, especially during the first few minutes. It’s, therefore, not necessary to score or cut whole wheat bread to prevent the crust from rupturing. Doing so would release too much gas and result in a weaker oven rise. So don’t score whole wheat bread!
Tip 12: Cool people, cool their bread
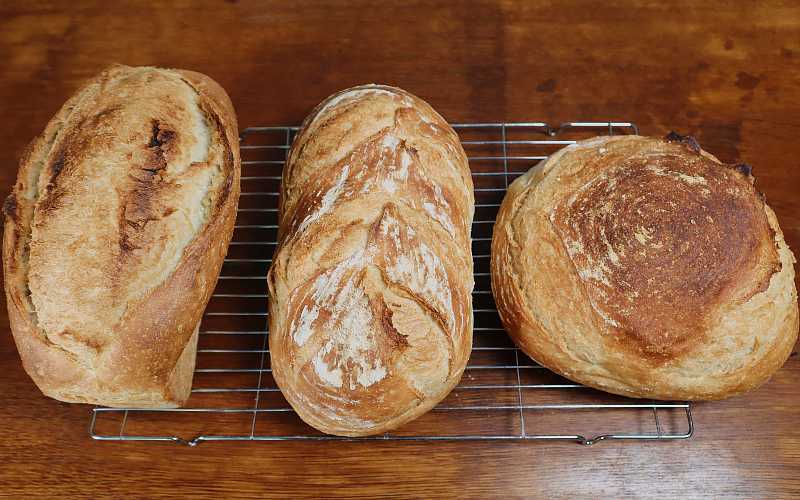
Once your bread is out of the oven, it must cool correctly. The best way to do this is to use a wire cooling rack, so your bread has plenty of airflow around it. Bread should be left to cool to blood temperature before it is cut. Not waiting for your bread to cool will abruptly end moisture escaping through the crust. Instead, water vapour rapidly escapes from the sliced area. Cutting your bread before it cools won’t make your bread dense, but it can make your crumb gummy and quickly become stale and hard.
Brown bread recipe – that won’t be dense!
Poolish:
- 300 grams whole wheat flour
- 300 grams water
- 1 gram fresh yeast/ 0.5 gram instant yeast
Dough
- 700 grams of white bread flour
- 340 grams water
- 20 grams salt
- 17 grams fresh yeast/5.5 grams instant yeast
- 30 grams vegetable oil
- 20 grams sugar
- 1 egg
To keep the recipe vegan, omit the egg and replace it with an extra 25 grams of vegetable oil.
Step 1 – Make the poolish
Weigh the 300 grams of water, add a pinch of yeast, and whisk until the yeast has dissolved. Next, add the 300 grams of wholewheat flour and combine it with a plastic scraper until evenly distributed. Cover with plastic wrap, and leave for 12-18 hours or until bubbles break the surface.
Step 2 – Add the ingredients
Once your poolish is ready to use, add salt, sugar and remaining water to a mixing bowl, and whisk until dissolved. Add the white flour and the remaining ingredients and combine in a bowl until a shaggy dough is formed.
Step 3 – Knead the dough slowly
Turn the dough onto your work surface and knead slowly for 4-5 minutes. Once the dough is even and you can feel the stretchy gluten, return the dough back into the bowl, cover and store it in the fridge for 5-10 minutes.
Step 4 – Knead fast
Return the dough to the table and knead aggressively for 5-10 minutes (or as long as you can last!). Gluten should be around 30-50% developed.
Step 5 – Bulk fermentation
Return the dough to the mixing bowl, cover and leave it to rest for 60 minutes.
Step 6 – Stretch and fold
Imagine your dough has four sides (easy if using a square container!). Pull the dough from one side and fold it over towards the centre. Repeat on all four sides.
Step 7 – Bulk fermentation cont.
Cover the dough again, and leave for 60 minutes.
Step 8 – Divide and preshape
Turn your dough onto a lightly floured worktop. Using scales, divide the dough into 3 equal portions and shape each piece into a ball.
Step 9 – Bench rest
Cover the 3 balls with a towel and leave them to rest on the counter for 20-25 minutes.
Step 10 – Final shape
Get 3 bread tins ready, then shape each dough into a loaf tin shape and place them into the tins.
Step 11 – Final proofing
Place the bread tins in a warm place, ideally around 25-28C (77-82F). Leave for around 2 ½ hours. If it’s cooler, this will take longer. If warm, it’ll rise faster.
Step 12 – Turn the oven on!
Preheat your oven to 240C (430F) with a baking stone (or thick baking sheet placed upside down) near the bottom of the oven an hour before your bread is to be baked. Add an oven-safe bowl at the base of the oven.
Step 13 – Bake your loaves
Once your bread has risen above the tin and passes the “poke test”, boil a cup of water and place it in a jug nearby your oven. Place your loaves on top of the baking stone or sheet. Pour the cup of water into the bowl at the base of the oven and quickly shut the door, trapping the steam inside. Reduce the heat to 230C (420F) and bake for 15 minutes.
Step 14 – Release the steam
Open the oven door to let the steam escape whilst checking the colour of your loaves. Lower the heat by 10-20 degrees if they are pretty dark. Bake for another 17-25 minutes.
Step 15 – Remove your bread from the oven
Check your loaves are baked by removing them from the tins and tapping the base. They should sound hollow. If not, return them to the oven for another 3-4 minutes.
Step 16 – Cool your bread
Place your loaves on a cooling rack with plenty of airflow between them. Leave to cool for around 2 hours or until they reach blood temperature. Then they are ready to slice and eat!
Ingredients that complement whole wheat bread
Butter
Butter shortens the strands in the gluten structure to improve bread texture. Whilst it’s not my preferred choice for longer-fermented bread, it can be used to improve the texture and moistness of quickly-made bread.
Vegetable oil
Vegetable oil also adds moisture to bread, improves texture and increases the gluten’s ability to stretch. Many seed oils contain the emulsifier lecithin, which further enhances the quality and freshness of the bread. Olive oil contains little lecithin but does add a flavour complementary to long-fermented bread.
Soy flour
Soy flour retains moisture and prevents whole wheat bread from being dry.
Sugar
Sugar has many benefits for whole wheat bread, so it’s common to see it listed as an ingredient on many loaves in bakeries and supermarkets. Sugar acts as a tenderiser and sweetens bread. Important in whole wheat bread, sugar provides an easy-to-process food for the yeast to speed up gas production at the start of proofing and increase total gas production. Adding sugar is pretty much a no-brainer for quickly-made whole-wheat bread. Honey, molasses and corn syrup can be used as alternatives.
Diastatic malt powder
Instead of adding sugar to whole wheat bread, malt flour adds more enzymes to break down starch into sugars. The use of malt flour provides food for the yeast without adding extra calories or changing the bread’s flavour.
Why is bread made with freshly milled flour so dense?
There are more variables when making bread with fresh flour than with store-bought flour. One of the most significant differences is that the wheat is not aged. Therefore adding an oxidiser such as ascorbic acid will strengthen the gluten structure and improve gas retention. If you mill your own flour, click the link above for more tips.
How to improve dense rye or spelt bread?
Rye and spelt flour have less protein content. In these doughs, building a structure that’s strong enough to retain enough carbon dioxide gas is tricky. Rye flour does not contain gluten proteins. Instead, it relies on clusters of pentosan proteins to capture the gas. The dough must be acidic when making 100% rye bread. An acidic environment protects the pentosan structures from collapsing in the heat. Adding white bread flour to rye or spelt recipes also improves gas retention, but if that’s not an option, try a slow rise with a mature rye sourdough starter.
Ending thoughts on fixing dense whole wheat bread
So we’ve covered why whole wheat bread is dense and what you can do to make your bread light and fluffy! What are you going to do differently next time you bake? Let me know, or ask any questions in the comments below.
If you’ve enjoyed this article and wish to treat me to a coffee, you can by following the link below – Thanks x

Hi, I’m Gareth Busby, a baking coach, senior baker and bread-baking fanatic! My aim is to use science, techniques and 15 years of baking experience to make you a better baker.
Table of Contents
- Why is whole wheat bread always dense?
- How to make whole wheat bread lighter at home
- Brown bread recipe – that won’t be dense!
- Ingredients that complement whole wheat bread
- Why is bread made with freshly milled flour so dense?
- How to improve dense rye or spelt bread?
- Ending thoughts on fixing dense whole wheat bread
Related Recipes
Related Articles
Latest Articles
Baking Categories
Disclaimer
Address
53 Greystone Avenue
Worthing
West Sussex
BN13 1LR
UK


