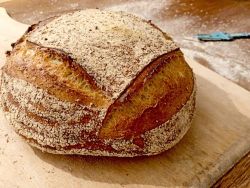
How To Make Bread Less Chewy | Why Is Bread Chewy?

What makes bread chewy? Bread can be chewy for a variety of reasons. Do you love soft and fluffy bread? Some people prefer chewiness because it feels like you are getting more food in your mouth. Other people don’t like the chewiness because it is tough on their teeth and jaw muscles. This post will show you how to make bread less chewy for softer, more enjoyable bread!
What do we mean by chewy bread?
When we eat something that we describe as chewy, we mean something dense or hard to chew. Chewy bread doesn’t easily slide straight down the throat. It requires a lot of jaw action before it can be swallowed. If you eat very chewy bread, you have a sore jaw afterwards!
The dictionary.com definition of chewy is:
adjective, chew·i·er, chew·i·est.
(of food) not easily chewed, as because of toughness or stickiness; requiring much chewing.
What sort of bread is supposed to be chewy?
Some types of bread are supposed to be chewy. Bread such as baguettes, focaccia, bagels and ciabatta can be chewy. Being more of a challenge to eat isn’t a problem for these types of bread. They are to be eaten with wet accompaniments such as soup, pasta or sandwich fillings.
The general consensus is that chewy bread is made from lean dough with high-protein flour. These are recipes that don’t contain sugars, fats or dairy. They are simply made from flour, water, salt and yeast.
Why is my bread chewy?
The most common reason for chewy bread is the type of flour. Using flour that is hard wheat or high in gluten can make bread chewy. This, combined with a lack of kneading and proofing, lead to a lack of gas in the dough, making bread dense and chewy.
How to make my bread less chewy
It is often easy to blame a recipe when we’re unhappy with the results. I definitely experienced this when I first started baking. I even threw my first artisan baking book in the bin because it didn’t match my professional experience. I regret it now. It was probably a very good book!
Anyway, I digress… Sometimes the recipe is absolutely fine. It’s just in need of a few minor tweaks to achieve the same result as the author. It could be as simple as switching the flour or warming the proofing temperature.
I will cover many solutions to prevent your bread from being chewy. Let’s start with the basics of making perfect bread:
Check your levain activity
You’re either going to be using a yeast-based levain, or sourdough to make your bread rise. There can be issues with them that impact how much your bread dough rises:
How to test if yeast is active?
Yeast does go out of date. If you have an old tin of dried yeast in your cupboard, it’s best to test it before using it. Add a teaspoon of yeast to some warm water and a little sugar. If it bubbles up, you’re all set!
If you’re using active dried yeast, you’ll have to activate it in some warm water beforehand. Simply follow the instructions on the packet and deduct the water used to activate the yeast from the recipe.
When using instant dried or fresh yeast, they can go straight into the dough, but as mentioned, if you are worried that it might be out of date, you can check it to see if it bubbles in warm water before you bake with it.
Baking with sourdough
When using a sourdough starter to make bread, the end result relies on the quality of the starter.
A healthy starter should be nice and bubbly and have a fragrant smell. It should double, if not triple, in size within 6 hours of being fed. If you are having trouble getting your starter to rise, see my sourdough starter troubleshooting guide to find out more.
Accurate measuring with scales
There is no way anyone can say using cups is an accurate way to measure flour. I even frown when pounds and ounces were suggested, but I am part of the metric generation!
To weigh ingredients for a bread recipe, you need to weigh every ingredient. Because yeast, sugar and other smaller weighted ingredients can be finicky when weighed in ounces, it is best to weigh everything in grams.
To do this, an accurate set of reliable scales is vital. I prefer a set that will go to 0.1 of a gram whilst also being able to weigh a couple of kilos of flour. These are very expensive, so I use a set of heavy-duty my-weigh scales for the flour and water, coupled with a cheap set of jewellery scales for the lighter ingredients.
You may already have a set you trust, and that’s great. But if you don’t, a small investment will be worth it 100%!
Work the dough harder
Kneading gluten makes it more stretchy. This is important for a lighter and less chewy bread texture as it will trap the gas produced by the yeast. This makes it airier and less chewy.
If you’ve not got a light crumb, try kneading more or working on your technique a little. See my guide on efficient hand-kneading techniques.
Change the hydration of the recipe
Bread can be dry and horrible to eat if there isn’t enough water in the recipe. Different flours absorb water at varying rates.
To replicate a recipe, you should consider the dough’s hydration. Adding more water to the dough hydrates the gluten and improves the structure’s extensibility. This allows the structure to retain more gas to be lighter and make the bread’s texture softer, like a bread roll.
Be careful, though, as too much water leads to a stickier dough, meaning the bread will have to be baked for longer to remove the water. This hardens the gluten, making it less soft.
See my guide on reducing the amount of water in bread to learn more.
Switch the flour
Using flour with too much gluten is one of the biggest causes of bread being strong and chewy. If you are using super high-protein bread flour, try switching to a lower-protein version.
The protein level of the flour is a good indication of its quality. However, selecting flour is not all about the protein percentage.
Switching between flour brands will often completely change the texture of the bread. So experiment a little.
Use natural tenderizers
The best way to make a dough made with high protein flour less chewy, is to add oil to the dough. A little bit of olive or vegetable oil softens the gluten whilst lowering the amount of water needed in the recipe to hydrate the gluten. This means the bread becomes softer and less chewy.
Plenty of bread recipes use ingredients like eggs, milk, or fat. These recipes are rarely dense and chewy because these ingredients tenderize the flour to make a lighter texture.
Ingredients such as eggs, vegetable oil and soya flour contain the emulsifier lecithin, which will bond the dough structure together, making it softer, more aerated, and less chewy.
If you’re looking for a simple fix to your chewy bread recipe, add a small amount of sugar (10 grams) and 50-100 grams of vegetable oil. It’ll make a big difference!
Work on your shaping
Perfecting your shaping technique adds strength to the crust, thus improving the quality of your crumb.
If you want a guide on shaping, no fear, you can find my shaping and preshaping guide here.
A few quick tips are to shape your dough twice by preshaping it into a ball or batard shape and leave it to bench rest for 10-30 minutes.
Then shape it again to its desired shape for proofing.
When shaping, stretch the outer perimeter of the dough, so it creates tension in the dough. This will support the dough structure and improve how moisture leaves the crumb during baking and cooling.
Adjust the proofing time & temp
The dough needs to rise sufficiently to fill the bread with air to make it light and fluffy. Yeast works faster when it’s warmer, so if it’s warmer or cooler in your area, your dough will need a longer or shorter rise.
Use the poke test to ensure it’s ready and proof your bread between 25-38C (77-100F) unless otherwise specified.
To control the temperature of your dough when it is proofing, I recommend investing in a proofing box. These bits of baking equipment warm the proofing temperature and eliminate temperature as a variable.
With a proofing box, you’ll be more accurate in your proofing times, your bread will be more consistent, and you’ll have the option to make bread faster! See how to make dough rise faster to learn more.
Here’s the proofing box I recommend by Brod & Taylor:

Don’t over bake!
To bake soft, delicious bread you need to bake it quickly at a high temperature. The bread shouldn’t take longer than 40 minutes to bake. Baking for longer than this causes the crumb to dry and become chewy.
I recommend adding water to the oven to make steam and baking at a high temperature (220-230C (430-450F) recommended) to improve the oven spring. A good oven spring lightens the crumb and crispens the crust.
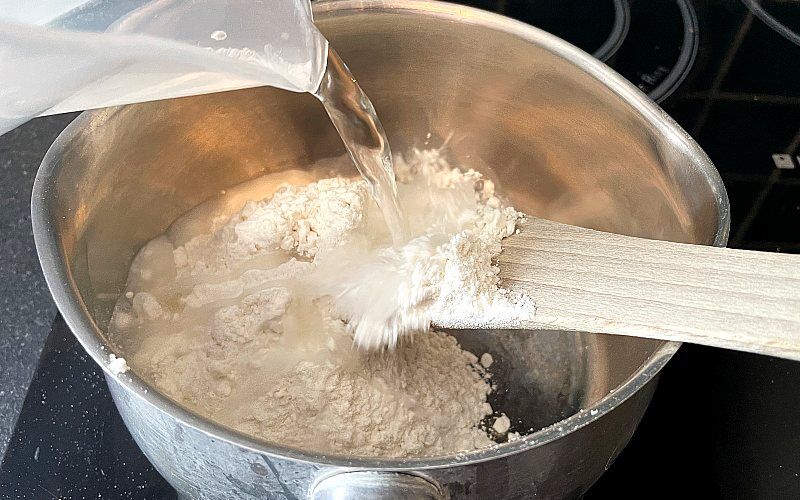
Use Tangzhong

If you’ve never tried a Tangzhong paste, maybe today is the day!
Tangzhong is a Japanese method of mixing flour and water in a warm saucepan to make a roux. Add the roux to your dough, and notice how your bread becomes softer!
Ending thoughts on making bread less chewy
Making bread can be a fun and tasty activity for the whole family. I’ve walked you through all the steps needed to create your own delicious loaf to suit everyone’s preferences! Let me know if this was helpful by leaving a comment below.
If you’ve enjoyed this article and wish to treat me to a coffee, you can by following the link below – Thanks x

Hi, I’m Gareth Busby, a baking coach, senior baker and bread-baking fanatic! My aim is to use science, techniques and 15 years of baking experience to make you a better baker.
Table of Contents
- What do we mean by chewy bread?
- What sort of bread is supposed to be chewy?
- Why is my bread chewy?
- How to make my bread less chewy
- Check your levain activity
- Accurate measuring with scales
- Work the dough harder
- Change the hydration of the recipe
- Switch the flour
- Use natural tenderizers
- Work on your shaping
- Adjust the proofing time & temp
- Don’t over bake!
- Use Tangzhong
- Ending thoughts on making bread less chewy
Related Recipes
Related Articles
Latest Articles
Baking Categories
Disclaimer
Address
53 Greystone Avenue
Worthing
West Sussex
BN13 1LR
UK


