The Secret Steps To Getting A Crusty Top On Bread

How to make bread crusty? Homemade bread with a crust that rips and crunches is beautifully delicious. In fact, if you can improve the crust of your bread, the entire bread is elevated to a higher level of quality. A true quality stamp says, “This bread rocks.” Or, “I’m not a beginner anymore!” many home bakers struggle to replicate the crispy crust found on professionally baked bread, and it can be hard to achieve without an oven that costs thousands, but guess what? After reading this, YOU WON’T! So, “how to get a crispy crust on bread,” I hear you ask? Let’s find out:
What makes bread crusty?
In comparison to soft-topped bread, crusty bread has a thin crust. The contrast of a light and airy crumb exaggerates the thin crust to make the bread more appealing. Two components must be achieved to make bread crusty. The first is that the crust must stretch in the oven, and the second is the crust must harden.
Stretchy, mature gluten can capture more gas than an underdeveloped one. Dough made from stretchy gluten rises effectively during proofing and in the oven. We call the rapid oven rise, oven spring. As the dough rises during oven spring the outer membrane (crust area) stretches and becomes thinner. After the oven spring ends and the steam is released from the oven, the crust area dries out and hardens. A thin barrier between the hot oven and the core of the bread is more effortless for moisture to escape the bread.
Moisture continues escaping from the bread’s centre as the bread cools. Particular starches gravitate to the crust area as it’s the warmest point and absorb the escaping water as it passes through the crust. Starch particles will continue to soak up water until they explode. And when they explode, a gel is released. As the starch explodes, you will hear crusty bread “crackling” or “singing” to you. The gel hardens as the bread cools to produce an extra-crisp, shiny layer around the outside. This is often seen as a clear sheen coating around the outside of crusty bread. So, the crust must stretch in the oven and then harden. In the next steps, let’s see how to achieve this to make crusty bread.
How to get a crispy crust on bread – A step-by-step guide
#1 Perfect dough development before shaping

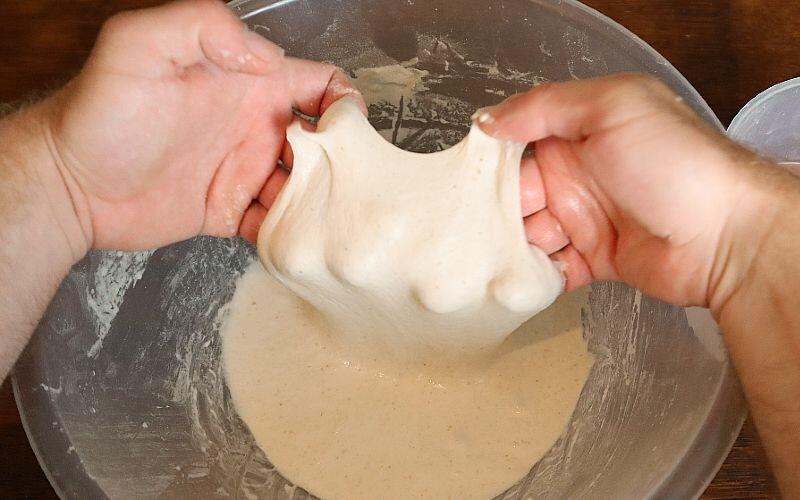
A good crust starts with a good dough. In fact, the most crucial component of the bread crust is the quality of the dough. A long mixing time with a quality dough mixer or hand kneading technique is vital for quickly-made bread. A well-developed dough will be strong and elastic and pass the windowpane test at the end of mixing. This strategy works when a short or zero bulk fermentation duration occurs.
An extended bulk fermentation period is preferred with sourdough and some artisan bread. Here, gluten development when kneading is reduced as the network has time to form naturally. In this case, the windowpane is reached at the end of bulk fermentation.
Of course, there are more ways to make bread than these! The main point is to decide when you’re gluten development will reach 100%, as it is essential for a crispy crust. Once you’ve decided what type of recipe you are going to use, perfect your dough by following these steps when kneading:
- Ensure the dough is well hydrated. It can’t be dry. Neither should it be so runny that your hands feel wet after touching the dough.
- The flour proteins must be gently hydrated before the dough is kneaded aggressively. This can be done using a slow mixing technique, or you could try autolysis. An autolyse is a fantastic way to allow the flour to hydrate and reduces the amount of kneading time required.
- Fat and sweeteners increase caramelisation in the oven, reducing baking time and creating a softer crust. Whilst a little (sub 2%) makes little difference, higher amounts of fat or additional sweeteners produce a less crusty bread.
Long fermentation periods
Long bulk fermentation periods lead to the natural development of the gluten matrix. The dough will also undergo fermentation, producing organic acids and ethanol, which (amongst other things) aid the gluten’s ability to retain gas and stretch.
Short fermentation periods
In a short, no-time bread dough the gluten matrix must be developed at the end of kneading. Gluten must be well-developed to retain gas during proofing. If gluten is underdeveloped, it will not rise as efficiently, and you won’t achieve a light crumb and crispy crust.
Long vs short fermentation
Many bakers believe long fermentation is the only route to achieving a crispy crust. And whilst it can be easier for home bakers not to worry about kneading so much, excellent crispy bread can be produced with a short or no bulk fermentation. This is because yeast produces a lot more energy when it produces gas in the intensively kneaded dough. The extra oxygen incorporated leads to a faster rise, especially in the oven. This results in a light crumb and a crispy bread crust.
The best of both? – prefermented flour
The use of a preferment (biga, poolish etc.) enhances dough maturity. Prefermented flour is a portion of hydrated flour that has already undergone yeast fermentation. Adding it to dough reduces the bulk fermentation time required by providing gas-retaining and flavour enhancements.
The question you should ask yourself is which route your dough will take before you make your bread.
#2 Shaping
Once you are satisfied with the amount of gluten development in your dough, the next step is to shape it. There are 3 stages involved in shaping; preshaping, the bench rest and final shaping.
Preshaping
After bulk fermentation, the dough should first be preshaped. The preshape stage is vital for the crust as it removes excess air from the dough (degassing) and forces the gluten to rebuild into a new structure.
Note: If you have pushed bulk fermentation quite far and the dough has doubled (or more) in size, be gentle when preshaping and shaping to retain more of the gas.
Bench rest
When dough is stretched, it becomes tense. This is great when we want to mould our shapes as it rises upwards. But it also means that between preshaping, and final shaping, it needs to relax to be malleable enough to be re-shaped. The dough should bench rest for 10 – 30 minutes before it is finally shaped.
Final shaping
Firm shaping helps the dough hold its shape during proofing. The key to shaping is to create tension in the outer membrane. This is produced by stretching the dough’s outer layer just enough to create a strong outer boundary between the inner dough and the air, but not so taught that it tares. The strong barrier holds the dough together, so it rises evenly, stretches during oven spring and forms a thin crust in the oven.
Shaping gassy dough
Dough that has risen more than 75% during bulk fermentation will feel gassy. This dough should be treated more gently than dough that hasn’t risen as much. The yeast will have already consumed much of the available sugars; therefore, removing too much gas can result in the sugar supply running out and the bread not being able to rise high enough.
#3 Proof the dough to the optimum point
For the best crust, proofing should be carefully monitored to not under or over-proof the dough. The poke test is an excellent way for beginners (and pros) to check if the dough is ready for the oven. The test involves touching the dough with your finger to make a small indent. The dough should be proofed for longer if the indent bounces straight back. If it takes 3 seconds to return, it is ready. If it takes over 3 seconds to return, it’s over-proofed and should go in the oven immediately!
NOTE: If your oven is not ready, but your dough is proofed, place your dough in the fridge to slow down the rise. For crusty bread, it's better to underproof than overproof.
#4 Score the dough with the perfect touch

Once the dough is ready to bake, the next stage is scoring. Here, the dough is scored with a sharp blade or serrated knife to help any excess gas release from the bread. For optimum, no-fuss crusty bread, a simple one cut at a 30-degree angle is all that is required. The cut should be reasonably deep, around 5-7mm. If you don’t have a baker’s lame, getting one is an excellent investment. I recommend this simple design by Mure and Peyrot. It’s loved by professionals and home bakers for its ease of use, longevity and low price.
Scoring tips
When scoring dough, one firm cut is best. Going over several times may make you feel “more connected” to the bread, but it tends to leave irregular lines after baking. Intricate bread designs look pretty, but they can cause too much gas to escape in the oven. If this happens, the oven spring will be reduced, making your bread crumb denser and the crust less crisp. Cuts weaken the tension in the outer perimeter, which is also unwanted in the formation of the crust. If you are new to making bread, the best way to make bread crusty is to use simple scoring patterns.
#5 Use a baking stone in the oven with steam
We need a good home baking oven set up for the best crusty bread. For this, we don’t need to be too fancy. There are two key components when baking to get a crispy crust on bread.
- Moisture at the start of baking
- Good conductivity of heat
Creating moisture in the oven
In a dry oven, heat quickly draws moisture from the crust, which makes the crust harden right away. This means that the crust sets quickly and ends the oven spring. It means the dough has a thick crust that slows the rate of moisture passing through. The resulting bread crust is softer as the starches on the outer perimeter have little moisture to absorb and do not release the natural gel to harden.
When steam is added to the oven, the setting of the crust is delayed. This is essential for:
- An extended oven spring duration
- A stronger oven rise
- Longer total baking time
- More moisture can exit the crumb
- More water is absorbed by the starch in the outer perimeter
These factors are essential for a crispy crust.
So, “how to add steam to an oven for bread?” The simplest way is to take a water spritzer and spray water into the oven as the bread goes in to bake. For more steam, preheat a baking sheet at the bottom of the oven to pour boiling water in at the start of baking. After 15-20 minutes, let the steam out of the oven by opening the door momentarily. This allows the full heat of the oven to harden the crust and make the bread crusty!
Use a baking stone

A baking stone serves three purposes:
- It conducts heat into the base of the bread, pushing moisture upwards to improve the oven spring
- Bakes the base of the bread
- Retains heat in the oven after cool bread and water lower the temperature
If you don’t have a baking stone, I prefer ones made with Firebrick. This is the same material used in professional deck ovens. Here’s the baking stone I recommend from Amazon.
Preheat the oven
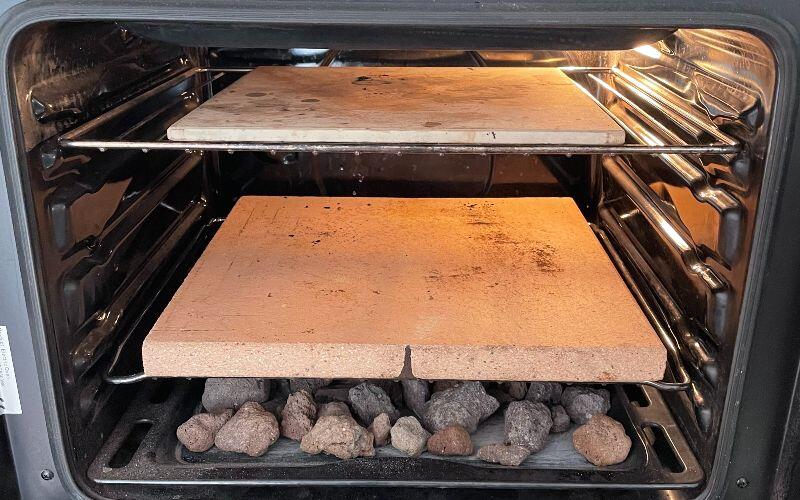
Preheat the heat so that the baking stone is hot to its core. This involves preheating for an hour before placing your bread inside. Place the baking stone on the low to mid-shelf and place a baking sheet on the shelf below. Once the oven is hot enough, drop the dough directly on the stone using a peel and pour boiling water into the baking sheet below, shutting the door as quickly as possible.
Improving heat conduction in a home oven
There’s a reason why professional bakers can make crusty bread with ease. They have superior ovens designed to conduct heat into the bread. You can recreate many of the same properties a commercial bread oven has at home with a few simple tricks:
Many bakers notice the oven temperature dropping as the bread is loaded. This is because the oven cannot return to temperature fast enough. High-quality ovens enjoy more even heat distribution, better seals and more power. You cannot improve all these things in a home oven, but you can do things to help. There are a few solutions that can improve your ovens bread baking capabilities:
- Change worn oven seals
- Use a second baking stone above the bread
- Use extra firebricks or lava rocks to retain more heat

Note: Whilst adding more heat-absorbing materials will help with heat loss, the extra materials increase the amount of time it takes for the oven to preheat.
How to use a Dutch oven to make crusty bread

A Dutch oven is a great way to make bread in a domestic oven. There is no requirement to add steam. The lid retains escaping moisture which is used to protect the dough. There is also less need to use a baking stone, although using one can provide better results. Choose a cast-iron pan or skillet like the Challenger bread pan, as they can be preheated for an extra crispy crust.
What is the best oven temperature for crusty bread?
A high baking temperature results in the crust darkening fast. This shortens the baking duration and creates a soft crust. Fast baking creates a soft-coloured crumb with a soft crust, perfect for Neapolitan pizza, but not for bread. If the baking temperature is too cool, the yeast may produce less gas before the crust sets. This can lead to an irregular, dense crumb structure and a chewy soft crust.
For a typical large loaf of bread, an oven temperature of 220 – 230C (430 – 450F) is best for a crispy crust.
#6 Review and enjoy!
Once you have followed the previous steps to make a loaf, you should have something that is more crispy than you have made before. Review this loaf and think about what you can improve next time. Keep trying new things to see if you can improve your recipe to make the crispy bread you desire!
Why is crusty bread so hard when making bread at home?
Whilst mastering the perfect dough is the key to making a great crust, the oven is the biggest culprit for not getting a crispy crust on bread at home. If you feel that you are mastering the steps above, try using an oven thermometer when baking. This will let you see how much the temperature within the baking chamber changes.
How to get a crispy crust on bread – conclusion
In this article, we’ve covered the importance of the dough, shaping, proofing, scoring and baking – in order to get the perfect crispy crust on bread. What will you do differently next time you bake? Let me know in the comments below.
If you’ve enjoyed this article and wish to treat me to a coffee, you can by following the link below – Thanks x

Hi, I’m Gareth Busby, a baking coach, senior baker and bread-baking fanatic! My aim is to use science, techniques and 15 years of baking experience to make you a better baker.
Table of Contents
- What makes bread crusty?
- How to get a crispy crust on bread – A step-by-step guide
- #1 Perfect dough development before shaping
- Long vs short fermentation
- #2 Shaping
- #3 Proof the dough to the optimum point
- #4 Score the dough with the perfect touch
- #5 Use a baking stone in the oven with steam
- Improving heat conduction in a home oven
- How to use a Dutch oven to make crusty bread
- What is the best oven temperature for crusty bread?
- #6 Review and enjoy!
- Why is crusty bread so hard when making bread at home?
- How to get a crispy crust on bread – conclusion
Related Recipes
Related Articles
Latest Articles
Baking Categories
Disclaimer
Address
53 Greystone Avenue
Worthing
West Sussex
BN13 1LR
UK


Leave a Reply