DIY Proof box – How To Proof Bread Without A Proofer?

Proofing bread at home is a skill, an art and a challenge. Although it is possible to proof bread on the countertop, for reasons we’ll cover in this article, it’s often not the best way to do it. So what can we use at home to create the ideal proofing environment? How can you make a DIY proofer? And, how to proof bread in the oven? Well, in this post, I’ll break down all of these proofing bread without a proofer questions, so you know your options, as well as why you should get a home proofer. And why you shouldn’t.
So, what is proofing?
Proofing dough is the process of letting the dough rise until it is ready to be baked. It gets its name from having to “prove” that it’s ready to go into the oven! The way bread rises is complicated, but in a nutshell:
Yeast cells feed on sugars that are derived from flour. As the sugars are consumed, carbon dioxide gas is produced, which fills air pockets in the dough. As they expand, the dough rises. Alongside this, other organic compounds and acids are produced through fermentation which adds flavour and maturity to the dough.
What is the best environment for proofing bread?
To prove bread, an environment that is humid, free from draughts and consistently warm is favourable. Yeast prefers to operate at a temperature of 36-43C (97-110F). However, bread is best when proofed between 25-38C (77-100F).
A dry or windy environment draws moisture from the edges of a raw dough, which leads to it drying out and hardening. If this happens, the dough is unable to rise any further.
There are many other variables involved when proofing bread, such as the amount of yeast in the recipe, the available sugars in the flour, the enzymatic activity of the flour (required to break down starches into sugar), and more. Temperature is a key variable as it impacts the rate yeast operates. If the proofing environment is too cool, the dough will rise slowly.
If we have the ability to control the proofing temperature, we can time our dough rise with much more accuracy, which makes it easier to produce great bread.
The other factor is humidity. Whereas a commercial bakery will control humidity to a degree of accuracy, it’s not possible to have this level of control at home. You may have seen other bakers cover a rising loaf with a bag or damp tea towel, or perhaps you’ve tried these or similar techniques before. Their goal is to create humidity to stop the dough from drying out. These methods work, but we’ll discuss other (better) options to provide moisture as we review the home-proofing methods in a moment.
The increase in air pressure from the extra water molecules in the air increases the activity of the water in the dough. This means that yeast ferments faster, making it more effective bread proofing environment.
What temperature to proof bread
The bread proofing temperature changes the rate of yeast activity. This not only increases the rate of the rise, but other characteristics of the bread will change too. The gluten structure will continue to develop after kneading, albeit slower. This means bakers who use long fermentation periods won’t need to knead their dough for long.
Many artisan bakers like a cool proofing temperature of 25-28C (77-82). This means that more flavour is produced by yeast fermentation. Quickly risen bread made by commercial bakers is proofed in proofers set at 38C (100F) for a more energetic rise and a softer crumb texture.
See do I have to knead bread for more insight into kneading bread dough.
Do you need a proofer?
By using a proofer, you remove two key variables in the process, temperature and humidity. This means that each time you follow the same recipe with the same ingredients, your bread should take the same amount of time to rise.
This is great from a timing perspective. But also, as temperature and time affect the gluten and organic acid development, the bread will look and taste the same every bake!
This is crucial for professional bakeries who use conveyor-belt systems leading to the ovens. And especially important for smaller batch producers who want to be able to time their multiple doughs, so they are not all ready for the oven at the same time!
At home, it’s not essential to have a proofer, but having one, or at least using some of the DIY proofing methods shown below, will help you to:
- Make better bread
- Rule out temperature when troubleshooting a problem recipe
- Plan your bread-making routine
- Make bread quicker (if you want to)
Types of proofers
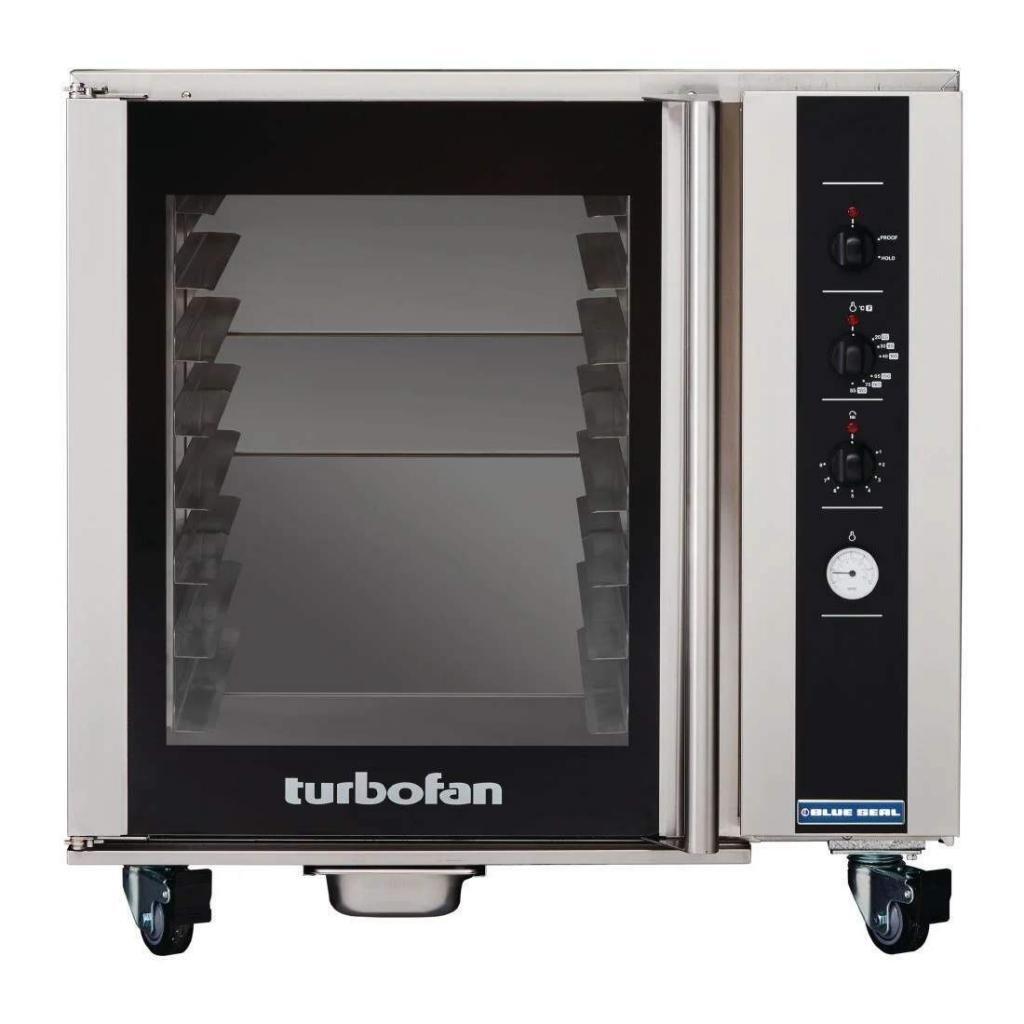
Some proofers are “walk in’s” where one or several racks fit. Others are countertop units that are the same size as a fridge. There are also home proofers that can sit on top of a worktop. Here are a few examples of professional proofers:
It is also worth considering using a dehydrator in a semi-professional bakery like this UK one by Buffalo. But for home bakers, there are other solutions… Although not quite as accurate at controlling temperature and humidity as commercial products, they are better than leaving dough on the worktop and hoping!
Building a DIY proofing cabinet
Making your own proofing cabinet is pretty easy! I was actually surprised! You only need a few bits of equipment to do this, which are listed with Amazon links below:
– A sealed container

Your DIY proofer should be built in a sealed container with good heat insulation. A polystyrene box is great for this. I’ve got these when ordering chilled food before, but you can order them online. As I’ve thrown all my polystyrene boxes away, I’m using a cool bag!
*The bigger the box, the longer it will take to heat up.
– Heat source

A heat mat designed for hydroponic use is my preferred and chosen route. The power capacity of the heat source must match the size of the box. The 20-watt one I have is perfect for a cool bag or small box. But a larger box would require more power (or two heat mats).
You could also use an office light if your box is big enough. You’ll need to cut a hole in the lid to feed the lamp through.
– Thermostat

A thermostat means you can set your desired temperature on the dial and not worry! It’s not essential to use a thermostat. You’ll most likely wish you had one if you don’t get one. The one I recommend uses a temperature probe that’s placed in the proofer. The heat source is connected to the thermostat with an ordinary plug socket. Once the desired temperature is reached, the thermostat cuts the power to the heater, and when the temperature drops, it turns back on again.
If you are not using a thermostat, the proofing box can become too warm. So you might want to poke holes through the box or leave the lid slightly ajar to let some heat escape. You won’t be able to fine-tune your proofing temperature without a thermostat.
– Humidifier

This is optional, but with one of these, you won’t need to cover your bread. You can pick up a small one that’s LCD powered for a very low cost. The only issue is they are not controlled. They just pump moisture out continually. Alternatively, you can fill a mug with hot water to release steam. It’s not as accurate as it cools down and needs replacing every 30-45 minutes, but it is a popular choice.
You can also decorate the outside with pictures of your favourite baker or whatever you fancy!
– Insulation layer

You’ll want a layer between the mat and the proofing dough. Without this, you might find that the base of your dough over-proofs or begins to bake! The most professional solution is a raised cooling rack. But a layer of cardboard or a couple of tea towels works fine. If you make a large DIY proofer, a shelved cooling rack could be handy for proofing multiple doughs.
Now to build your proofing box!
All you have to do is:
1) Put the heating mat at the bottom of the proof box. Connect it to the thermostat.
2) Stick the thermostat’s temperature probe to the inside of the container.
3) Plug the mat and the thermostat cable into the power.
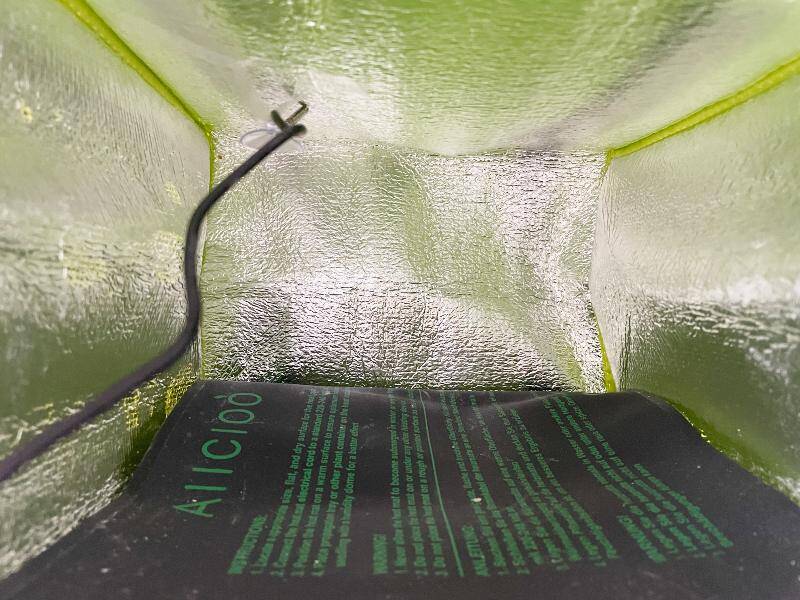

4) Lay your insulation at the bottom of the proof box
5) Position your humidifier inside (if using)
6) Turn the appliances on and set the temperature.
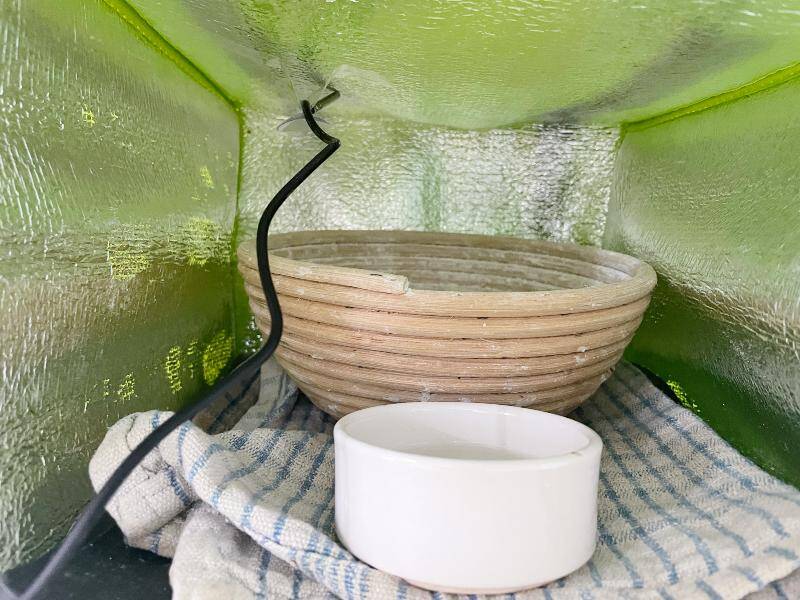
7) Leave for ten minutes to warm, and you’re ready to go!

How long does a DIY proofer take to heat?
The heating time depends on the temperature of the room at the start, the size of the DIY proofer and the power of the heat source used. I find that it takes 2-3 minutes to increase one-degree Celsius.
Can I buy a home proofer?
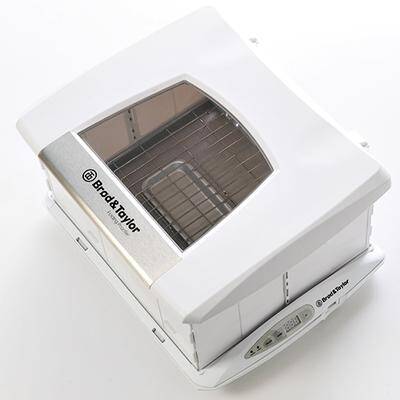
The Brod & Taylor home proofer came out a few years ago, and it’s currently leading the way for home bakers to proof bread at home. You are able to control the temperature for optimum proofing control! There’s also a perfectly placed bowl to hold warm water so that it can self-steam to create humidity. So if you don’t want the faff of making your own, head over to the Brod & Taylor website or Amazon.
Proofing bread in the oven
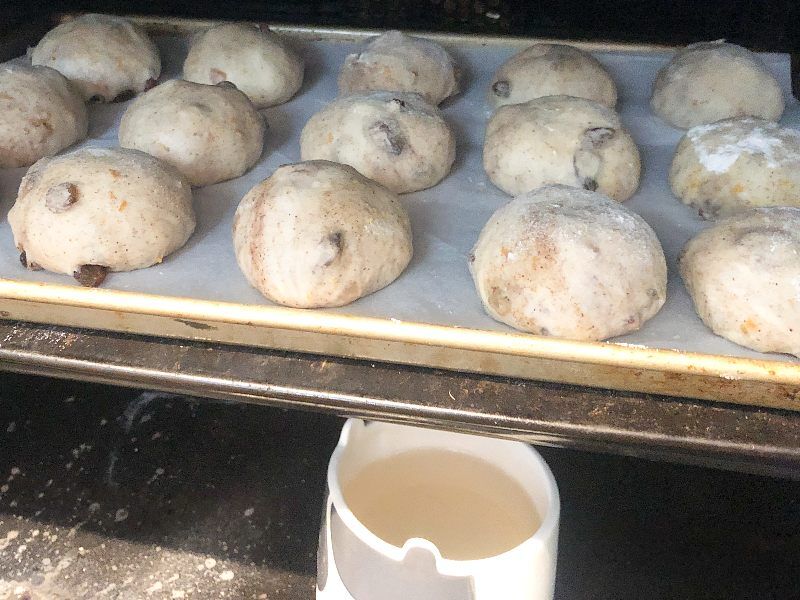
Tip: If you can’t set your oven temperature below 40C don’t heat up the oven. Instead, just turn the light on. This will produce an extra 5-7 degrees extra warmth to speed up your proofing.
Ovens make excellent home-proofers. Its walls are thermally insulated to retain heat and moisture, just like a proofer! Some ovens have a “proof” setting which is pretty handy, but you can use any domestic oven. All you have to do is:
- Turn the dial to 30C (86F) – you might have to guess a little
- Add a bowl of steaming water to the oven, or cover the proofing dough with a bag
- Place the mixing bowl or proofing device on the centre shelf
- Check the temperature every 5 minutes until you’re confident that it’s not too hot or too cold
- The water will need replacing every 45 minutes or so
A challenge of this method is when it’s time to turn the oven on to bake your loaf! To resolve this, proof the dough in the oven until it’s ¾ proofed and leave it to proof on the counter whilst the oven warms up fully. If you are worried about over-proofing, you can pop the dough in the fridge to slow the rise.
You can also use the heat mat method in your oven for more accuracy. Just don’t forget to remove it from the oven after you finish with it!
Proofing bread in the microwave
Using the microwave to proof bread is another great method that you can use to proof bread dough or keep a sourdough starter. It’s simple to follow:
- Place the dough inside the microwave
- Add a cup of steamy water next to it
- Shut the door, leaving it slightly ajar so the light stays on. A piece of cardboard wedged in the door is a good solution.
- Let the dough rise!
Proofing bread in a yoghurt maker
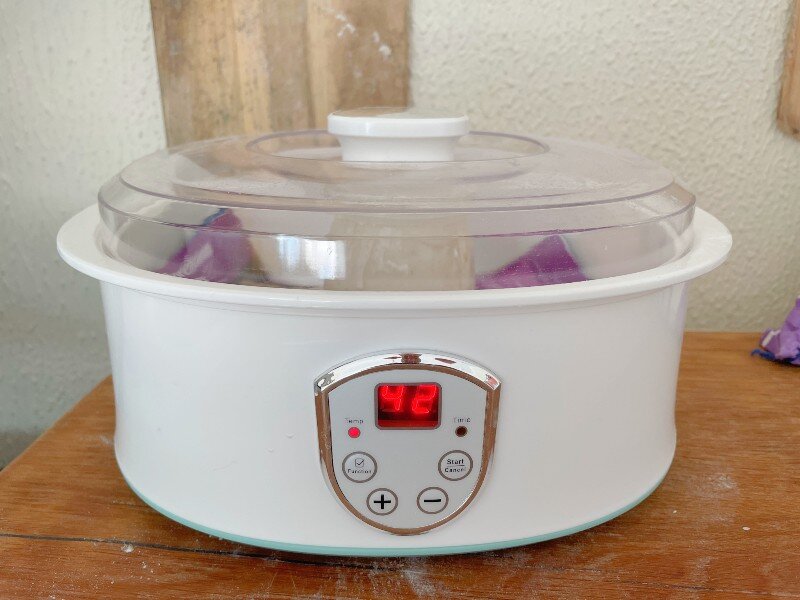
One of my favourite baking hacks recently is to use a yoghurt maker to warm a sourdough starter. This one I found this one in a charity shop for £12.50. It has a digital control to set the temperature, like the Brod & Taylor. I can set the temperature, the lid prevents moisture from escaping, and it was a bargain! I love it! The only constraint is it is small, so I can only fit sourdough starters or a small banneton inside. You may be able to pick up a larger one if you pursue this option.
Can I make a proofing box with a bowl of hot water?
A bowl of boiling water in a small box will increase humidity alongside temperature. The issue lies where the water heats the area up quickly and cools down again. This isn’t great for an even crumb structure. I’d rather use this technique in an insulated environment alongside a steady heat source such as a microwave light or oven – with a bit of water for moisture. But you can buy one of these:

Do I need to build a proofing cabinet?
The ability to control the bread proofing temperature doesn’t have to be just for professionals! Imagine being able to know what time your bread is going to be ready? Or if the dough doesn’t rise, knowing the problem is with the dough, not the temperature? As the flavour of sourdough is very temperature-driven, it’s great to experiment with different fermentation temperatures to develop different types of acids! By making a DIY proofing box, instead of buying one, you’ll be able to make one big enough for your needs and maybe even save some money.
DIY proofing box ending thoughts
So what do you think about making a DIY proofing box? Is this something you want to have a go at? As someone who’s baked bread at home for years and only recently started to use these solutions, I’m very passionate about getting other home bakers to use a proofing box! They are so handy! Let me know what you think in the comments below.
Proofing bread frequently asked questions
If you’ve enjoyed this article and wish to treat me to a coffee, you can by following the link below – Thanks x

Hi, I’m Gareth Busby, a baking coach, senior baker and bread-baking fanatic! My aim is to use science, techniques and 15 years of baking experience to make you a better baker.
Table of Contents
- So, what is proofing?
- What is the best environment for proofing bread?
- What temperature to proof bread
- Do you need a proofer?
- Types of proofers
- Building a DIY proofing cabinet
- Now to build your proofing box!
- Can I buy a home proofer?
- Proofing bread in the oven
- Proofing bread in the microwave
- Proofing bread in a yoghurt maker
- Can I make a proofing box with a bowl of hot water?
- Do I need to build a proofing cabinet?
- DIY proofing box ending thoughts
- Proofing bread frequently asked questions
Related Recipes
Related Articles
Latest Articles
Baking Categories
Disclaimer
Address
53 Greystone Avenue
Worthing
West Sussex
BN13 1LR
UK
