Adding Water to an Oven to Make Steam – Best Way Explained

Amazing bread does not have to be restricted to bakers in commercial bakeries, you can also make fantastic bread at home. One of the most crucial components in accomplishing great bread is to generate steam in the oven by adding water to the baking chamber.
To do this effectively, of course, some skill is required. And in this article, I’ll show you my current favourite way to add water to the oven, as well as several other practical techniques to steam bake bread.
I’ve tried all of these methods in a variety of ovens, and after years of baking combined with months of intensive testing, I believe I have a good idea of what works and what doesn’t in each situation.
Why do you put water in the oven when baking bread?
Water added to the oven will evaporate into steam. When baking bread, we add water just as the bread goes in to bake. This helps the bread rise in the oven which benefits it in several ways.
The steam condenses into water vapour which is the white gas that we see coming from a boiling pan of water. Steam protects the dough’s crust from hardening, this allows the dough to continue its rise in the oven which we call the “oven spring”.
After 10-15 minutes, the oven spring ends and the steam is released which allows the crust to harden. As a result, steam baked bread tends to have a crisp crust and a light, aerated interior.
How a professional baker makes steam
Commercial bread ovens are fitted with steam jets. A tank of pressured water powers these jets. When the oven demands it, the jets are opened, and a measured amount of water is released into the baking chamber. Depending on the system the oven uses, it usually takes a few minutes for the steam to be ready for the next batch.
Equipment for adding water to an oven
Regardless of the tools used to bake bread, there will always be some form of oven spring. However, for the most effective oven spring, there are several factors and equipment to consider. Before looking at the method, let’s inspect the important equipment in a home baking setup:
Baking stone

The baking stone is used to retain and conduct heat into the bread. It isn’t necessarily required to create steam, however, it is synonymous with a higher oven rise and is essential for evenly baking the base of the bread. Here is the baking stone I recommend due to its excellent heat distribution and durability.
Baking tray

You will also need a decent tray with a high lip to lay at the bottom of your homemade steam oven. A cast iron pan is perfect as it soaks up heat and radiates it in the oven. You don’t have to use a cast iron tray, but it will need to withstand high baking temperatures of 240C (465F) without wilting. If you don’t have such a tray already, try these.
Water mister

A water mister is a handy tool to have when making bread. I use it in conjunction with a baking tray, although you can use a water mister as the sole method of creating steam.
It’s a handy tool to have around as well. I use mine to prevent dough from drying up on the surface or spraying glazes on sticky buns.
For home ovens, a standard water mister from a local hardware store is all that is required. If you don’t have one nearby, you can get one here.
Water boiler
You’ll also need something to boil water in, such as a kettle or small saucepan!
The best way to add steam to an oven at home
One of the biggest challenges when adding steam to an oven at home is dealing with the weaker seals on home ovens. This means we have to add more water to compensate for some leakage. But too much causes it to cool down too much.
Baking at cooler temperatures reduces oven spring, alongside the colour and crispiness of the crust.
This method is the best way I’ve found to bake bread in a domestic kitchen. Here are the steps that I follow:
1. Preheat the oven to 240C (450F) with a baking stone and a deep tray on the shelf below for 1 hour

Turn the oven on early enough with a baking stone and a deep pan on the shelf below it. An hour should preheat the stone thoroughly, but it can take longer if a thick stone and a less-powerful oven are used.
Use an infrared probe to check the stone has preheated.
2. Boil the kettle
When it’s time to bake your loaf, boil the kettle first and pour the hot water into a large cup or jug.
3. Score the bread
Place your loaf on a lightly floured peel and score it. The score is important as it dictates how the gas rises during its final rise.
Too deep and too much gas will escape, and your bread will be flat. If you don’t score deep enough, the loaf will expand in a cone shape or, worst still, explode to the side.
4. Place the bread on the baking stone and adjust the heat
Turn the temperature down to 230C (430F), open the oven door and slide the dough off the peel onto the baking stone.
5. Pour the boiling water into the pan underneath
Put on heavy-duty gloves and pour your boiling water onto the heated pan underneath the stone.
6. Shut the door!
Without burning yourself – shut the door as quickly as you can!
Optional – Spray with a water mister
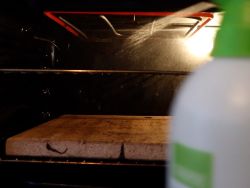
For more steam: After 30 seconds, spray the baking chamber with water in a water mister for 3-5 seconds. Quickly shut the door, wait 30 seconds and spray again.
If this method doesn’t create enough steam…
Two things can go wrong. The first is the water can cool the oven too much. The second is the steam escapes too quickly. To counteract these problems, I have a few solutions which I use:
– Lava rocks
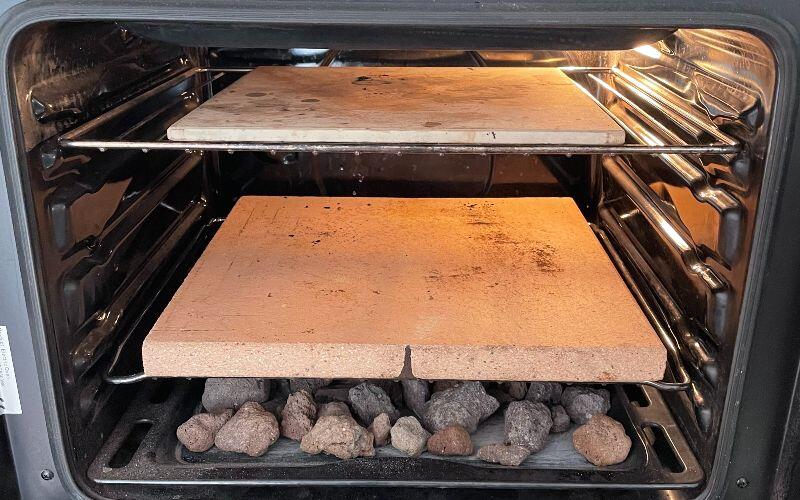
Fill the preheated pan at the bottom of the oven with lava rocks. These will increase its storage heat so the temperature doesn’t drop so much after the water is added.
– Two baking stones
If you find the base of your loaves are pale on top or take longer than 40 minutes to bake, it is affecting the quality of your bread. In this case, place a second baking stone above the 1st. This will store heat above the bread and create a “baking chamber” for your bread.
If you’re finding the steam disappears still, use two cups of water including the hot towels in a roasting pan method shown below.
Tip: Spraying the oven with water must be done within the first 2 minutes of the bread going in. The change in pressure by opening the door later than this will make the bread collapse. You'll also want to keep the hot air in the oven as much as you can!
Do I pour water into a tray and spray the oven?
You don’t need to spray the oven as well as pour water into a baking tray. One of these methods is often enough. I add the cup of water first and look through the oven glass. If there isn’t much steam or moisture settling on the outside of the bread, I’ll quickly give the oven a spray.
Pulling the damper
Bread ovens have a lever that opens a little hole in the back of the oven called the damper. After the oven spring is completed, as water is an insulator of heat, the remaining steam slows down the baking process.
After 20-25 minutes, the damper is opened to allow the steam to escape. This intensifies the heat so the crust becomes hard and crispy.
At home, opening the damper can be replicated by opening the door slightly for a couple of seconds every couple of minutes.
What temperature should the water be when adding it to the oven?
My preferred way to add steam at home uses boiling water for the preheated tray. Boiling water produces steam so quickly that it often flies out of the oven before you can close the door! If this is a concern of yours, the best solution is to add more water, but you may prefer using water at different temperatures. Let’s take a look at the pros and cons of using cooler water.
Using tap water to create the steam
To avoid the faff of messing around with boiling the water, you can use water at the temperature it arrives from the tap. Cooler water evaporates into steam slowly. Therefore, more of the steam is retained in the oven.
The downside to using cooler water is that it lowers the temperature of the oven, and some ovens just can’t cope with this. It could take ten minutes or longer for the oven to regain baking temperature. This is going to affect the quality of your bread as the bread will need to be in the oven for longer to brown. This leads to a dry crumb texture.
One of the positives of using cooler water is that steam is produced for a longer duration. If the seals of the oven aren’t great, steam escapes quickly, so extending the length of time that steam is produced extends the time the bread oven springs. It also means that you are less likely to burn yourself!
Using ice cubes in an oven
Dropping ice cubes into the preheated tray is a common way to create steam. With ice, an even steadier stream of steam is created than tap water. However, this does cool the oven severely, and the lower baking temperature produced is less desired for bread.
If you have a powerful oven, this method could be the best solution to creating steam. It’s also a sensible suggestion when using a Dutch oven, which we’ll come onto later.
The Pour, Close & Run method
When baking in a professional deck oven fitted with steam jets, adding steam is as easy as pressing a button. Yet it’s common for these pipes to clog with mineral deposits, especially in hard water areas.
Fixing them is expensive, and the ongoing repair costs can lead to them not being fixed. So, back when I worked as a baker, we devised our own method.
As the bread went in the oven, we’d pour a cup of water on the area just outside the baking stone, quickly close the door, and run away. This method works well.
We could easily over-steam the bread if we got carried away!
However, cold water can shatter an unexpecting baking stone. But they weren’t our ovens, and we were young, so didn’t care!
Is it steam or water that we add to the oven?
This is more of a question about terminology! Professional bakers have pressured steam jets in their ovens, so they are “adding steam”. Many home bakers will say they are “adding steam to the oven”, whereas, in reality, they are adding water to create steam!
We can be technical about the phrasing being correct, but it doesn’t matter, does it? Adding water or adding steam are both terms that are used interchangeably.
Using a spray mister way to make steam
One of the most popular ways to add water is to use a spray mister. It’s pretty simple, and I use it today in deck ovens instead of the previous, and many home bakers prefer it to create steam in a domestic oven.
Since I have been using a Rofco oven, as the door opens sideways and the seals are really good, I use this method.
Once the bread goes in the oven, aim the water spray at the inner walls and mist. After 3-5 seconds of spraying, quickly shut the door. You can then wait 30 seconds and spray again, in a different area of the oven. This can be repeated a third time if wished.
Spraying water in three intervals allows the oven to heat up between sprays and gives time for the steam to distribute through the air inside.
Tip: Spray carefully to avoid light bulbs, the door glass and the baking stone. These can shatter. Also, avoid spraying directly on the bread.
As water hits the oven walls, it can leave watermarks which are hard to clean off.
A standard water mister doesn’t create as much steam as the other options as the steam escapes too quickly. This is why I suggest combining this method with pouring hot water into a hot tray when using a domestic oven.
Below is the water mister I recommend for creating steam in a small oven.
For more professional setups, you might want to take a look at a heavy-duty to pump water in at a faster rate. The one below comes with a large storage tank, so you won’t have to keep refilling.

Using a water bath in the oven

Baking bread in water baths works well. Peter Reinhart even recommends it in his book The Bread Bakers Apprentice. That said, it does have some flaws…
It is easy to over-steam bread if you use this technique. It also requires you to remove the tray of boiling water from your oven, which is quite dangerous. But it’s handy to know if you have issues with my preferred method.
It’s a great way to add steam if you have a gas-powered cooker or one with poor seals. Here’s how it works:
- Preheat the oven with a baking stone (or two) as normal.
- When the stone is up to temperature (you can use an infrared thermometer to check) and the bread is almost ready to bake, fill a deep roasting tray half-full with water. Place it on a shelf below the stone.
- After 5-10 minutes, the baking chamber will fill with steam, and the scored loaf is put in to bake.
- After 15 minutes, take the water bath out – be careful, it’s boiling water!
Using wet towels to create steam in the oven
This is a development of the water bath method that was brought to my attention by Maurizio Leo. You’ll need a small tray and some thick dish towels. The more towels you use, the more steam you generate. Cheap towels are best, as some will burn and soon require replacing.
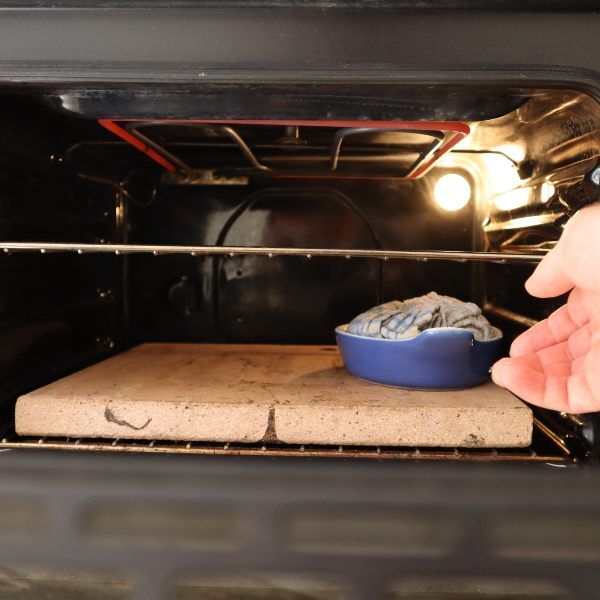
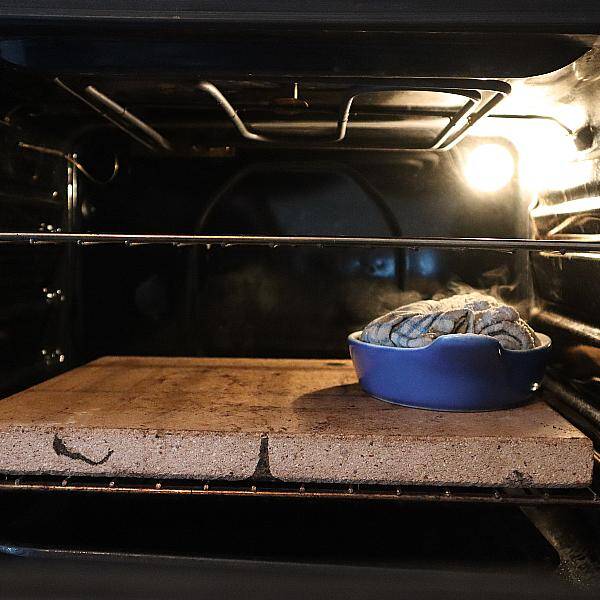
Roll the dishtowels, place them inside the pan and pour boiling water over them. Put the pan inside the oven for 5 minutes before you are ready to bake. The pan saturates the baking chamber with steam before the bread goes in. Use cast iron as it absorbs as it preheats to maintain a high baking temperature.
Use this method instead of the water bath or alongside other methods for extra steam injection. As you can see in the image above, this method creates a steady supply of steam, but not enough to be the sole solution.
Can I just wet the bread instead?
The simplest way to add water when baking bread is to spray or brush water onto the bread before it goes into the oven. But I generally advise against doing this!
Spraying the dough produces a gummy crumb through over-steaming. Pale, unappealing colours and any flour on the outside of the bread turns into a paste when wet. When baked, it becomes a dull, unpleasing colour, and cuts don’t open up as they should.
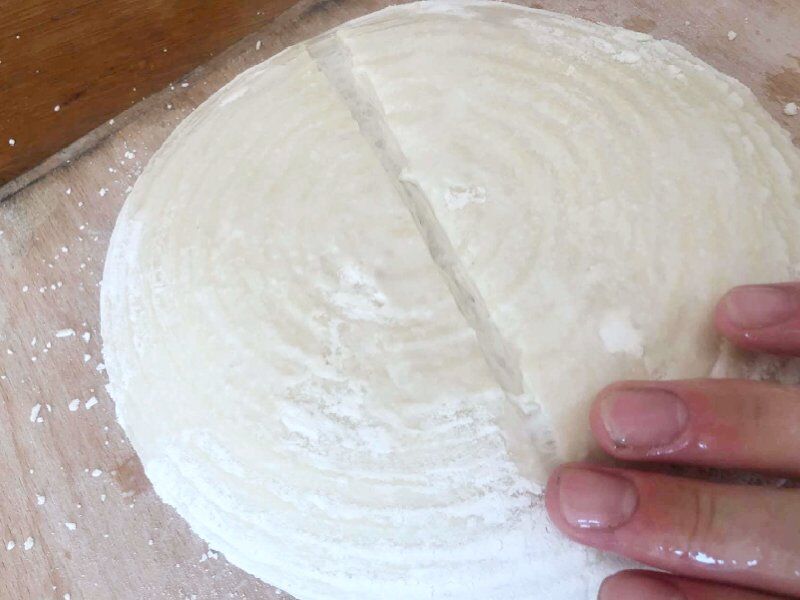

You’ll see blisters where water has attached to the dough surface during baking.
Bakers looking for blistered San Francisco-style bread choose to do this, but I’d instead use an overnight rise in the fridge and achieve it properly. By all means, experiment with this technique. Some people swear by it.
How to create steam in a Dutch oven
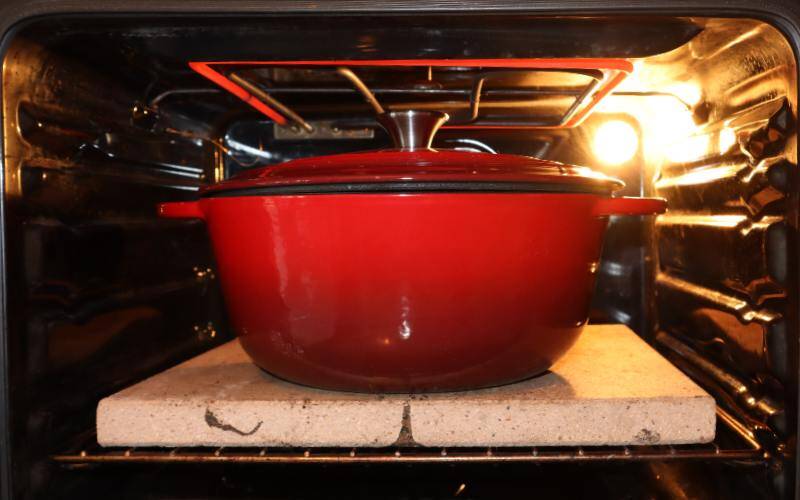
If you are using a Dutch oven to bake your bread, there are 3 main ways to use one:
- Preheat the oven with the Dutch oven inside
- Preheat the oven, but not the Dutch oven
- Start the bake in a cold oven, using a cold Dutch oven
A Dutch oven creates an enclosed space inside your oven to bake. The lid retains the moisture released from the bread as it bakes. This means that additional steam is not required. It’s a beginner-friendly, less-fuss solution that has become increasingly popular over the last 10 years.
Should you add steam to a Dutch oven?
Much as it’s not essential to add extra steam to a Dutch oven, some bakers find it does produce a better oven rise. Each baking method has a preferred way to generate steam.
If starting the bake from a cold oven, chucking a few ice cubes into the side of the oven works well. If the oven is preheated, but your Dutch oven is cold, you can spray the chamber lightly with a water mister. When using a hot oven and preheated Dutch oven, just pour a quarter or a cup of water around the edges and quickly shut the lid.
When the Dutch oven and the oven are preheated, the rise is quicker. Therefore, I don’t tend to bother adding extra steam.
If you are struggling with oven spring, know that it’s just as likely to be an issue with the dough as the baking side of things. See my oven spring guide for more tips on how to perfect your oven spring.
Why do you need to add steam when baking bread? – The science behind the method!
We’ve covered the best methods of adding steam to the oven, and I’ve explained the basics on why it’s so vital to making excellent bread. But we haven’t really touched on the science behind why it works, and by understanding this, I’ve been able to really kick on and take my bread baking to another level!
So here goes:
In a non-humid environment, dough, when exposed to heat will dry and harden. This is called the “crust set point”. But when steam is applied, the moisture protects the outside of the bread to delay the set point.
As water vapour is retained inside the oven, like a cloud, the air becomes dense and heavy. When a loaf goes into the oven it’s the coolest thing, so it attracts moisture -just like a bathroom mirror gets condensation after a hot shower.
The moisture latches onto the exposed surface of the dough, and the thin layer of water protects the bread from the heat.
If you’ve been to a Swedish sauna you’ll know that pouring water on the stones intensifies the heat. Though it doesn’t get warmer in the sauna – check the dial. The water actually cools the temperature, but due to the increase in humidity, the heat feels more intense. As you are the coolest object in the room, water condenses on your skin, just like bread in an oven.
The moist crust area cannot harden, which means it can stretch and rise as the yeast creates gas in the oven spring. Yeast increases activity as it warms to create gas rapidly. Most of this gas will be captured in the gluten matrix, and the dough expands. See how yeast works for a detailed guide on gas production.
Water is a poor conductor of heat but a much better conductor than air. So it absorbs some of the heat in the oven to protect it from the baking bread. Heat intensity in the oven is reduced, except where the base of the bread is in contact with the baking stone. The result is:
- The dough can rise further in the oven spring
- Baking time is extended
- The base of the bread becomes harder
- More moisture can escape the loaf
- Starch can coagulate inside the loaf
Softer bread, baked without steam, achieves a coloured crust in a much shorter time.
The water vapour increases pressure in the oven. This supports the dough rising in the oven. When the bread is soft, any rapid pressure changes can lead to the weak structure collapsing. This is why the oven door should not be opened between 2 and 15 minutes when adding steam.
The oven spring ends when either the crust sets or the dough’s core temperature passes 71C (161F). At this temperature, it is too hot for the yeast and it becomes permanently deactivated.
After this point, the steam is released from the oven. In this dryer environment, heat draws water to the bread’s edges, where it evaporates into the air.
The edges of the bread bond together (coagulate) as it dehydrates to form the crust. Dough with a strong and elastic gluten network creates a stronger crust.
After a good oven spring, the bread will have expanded to produce a lighter crumb, and the crust membrane will stretch and, doing so, makes it thinner.
The crust must be thin to allow as much moisture to escape the bread as possible. This is important as the escaping moisture latches onto the starch in the crust area to create a crisp crust.
For a crusty crust, knowing how to knead dough, good shaping and oven skills really make a big difference.
Why does bread sing to you as it cools?

When crusty bread is removed from the oven, it rapidly crackles, which sounds as if it’s singing to you! Singing bread is related to the glazed sheen that also appears on crusty bread.
The glaze is created as the heat draws starch to the outside edges of the bread. Some of the water that passes from the bread’s core is absorbed by the starch.
The thing about starch is it has no control limits when absorbing moisture. It continues to absorb water which makes the particle grow until it finally gets so big that it bursts.
For a nice, crisp crust your bread needs to cool down correctly with plenty of airflow around to take away moisture as it exits the crust. It also needs to cool for long enough. Read how long to let bread cool down to learn more.
What is starch?
Starch is made from chains of smaller sugars broken down from carbohydrates in the flour. Similar to how heating sugar makes a dark syrup or golden caramel, natural sugars found in baked bread generate similar colours in the crust. You may have noticed that longer fermented bread is a darker brown colour compared to quickly made bread that tends to be more bright orange. This is because more starches are broken down into sugars during the long fermentation.
As the starch particles burst, a gel coats the outside of the loaf. The bread continues to bake, making the gel hard and shiny. Once the bread is removed from the oven to cool, the process continues, and the bursting sounds like bread is singing to us! The burst starch becomes brittle and makes the crust shiny and just that extra bit crispy.
Baking bread without steam vs with steam

Bread baked without steam requires a shorter baking time. The crust will also be thicker, which prevents moisture from escaping its core. This baking style means the bread will not have that shiny layer of hardened gel. The extra water retained in the crumb makes it more moist and soft. Less oven spring caused by the quick setting of the crust makes a denser bread, but some oven spring still occurs.
Should I add steam to every bread I make?
If you want your bread to benefit from the oven spring fully, then yes, add steam. But there are bread types that you should not bake with steam. A fantastic example is soft bread rolls which are baked quickly.
Doughs containing fats or sweeteners such as butter, eggs or sugar such as brioche, croissants, brioche, and panettone need less steam added. In these doughs, the starch gelatinizes at a higher temperature. This means that the crust set point is already delayed.
If you choose to add steam anyway to a heavily enriched dough, it will have little effect on the oven spring. It will, however, increase the humidity of the oven to slow the baking process. It will also mean that the bread bakes more evenly and adds a shiny gloss to the outside of the crust.
How much steam to add to the oven when baking bread?
The usual amount of water to add is 1 cup, but less can be used in better-sealed ovens. The amount of water to add to the oven will depend on the type of crust you want on the bread. Adding a small amount is perfect for bread like croissants, focaccia or soft ciabattas. It allows them to get a nice aerated crumb without a crispy crust. To make bread with a strong crust found in sourdough bread or baguettes, more steam is used.
Here’s a table of how much steam to add to bread and which types of bread don’t require any steam:
| Bread type | Amount of steam required |
| Sourdough bread | Medium to high |
| Chewy sourdough | Low to medium |
| Tin bread | Medium |
| Sandwich baked with a lid (Pullman) | No steam |
| Traditional cobs | Optional (to taste) |
| Soft rolls | No steam |
| Batch bread | No steam |
| Croissants & pastries | Low to medium |
| Baguettes | Medium to high |
| Vienna bread | Medium |
| Focaccia | Low |
| Crusty rolls | Medium to high |
| Pizza | No steam |
High steam: 1½ cups or several spritzes with a water spray
Medium: 1 cup or a long spritz with a water spray
Low: ½ cup or quick spritz with a water spray
What does too little steam look like?
Bread that has been under-steamed will be dull and have a thick crust. Expect the bread to bake quicker than expected and the crust to turn soft soon after it cools.
Can I add too much steam when baking bread?
It is possible to add too much steam to the oven. This is most noticeable when the cuts (scores) don’t open out well. Overly steamed bread spreads outwards, is less 3D (no upwards rip) and has a featureless crust.
They tend to have less volume so they have a dense crumb. The crust colour will be pale and largely missing irregularity and tone.
The taste of over-steamed bread is also affected. It’s boring.

Why is my bread dense?
A common troubleshooting question I get asked is why is my bread so dense? Whilst I have a full article that goes into the subject in much more depth, a common fix is improving the effectiveness of the oven spring. When water is added to the oven it quickly evaporates and latches to the air molecules forming steam
Ending thoughts on adding steam to the oven
Together we’ve covered together how to create steam in the oven to bake bread, learned how it works and how to adjust the method to get personalised results for your bread and in your oven.
The biggest challenge you will have is mastering how your oven reacts to your choice of steam. Does it retain it well? Does it cool down too much? You may need to experiment a little!
Believe me, it is worth getting the method for adding steam to your oven nailed. For crusty, light and airy bread, you need to add steam!
Did I answer all of your questions? Let me know in the comments below so I can improve this article to be the best guide on adding steam to the oven!!
Adding steam to the oven – frequently asked questions
If you’ve enjoyed this article and wish to treat me to a coffee, you can by following the link below – Thanks x

Hi, I’m Gareth Busby, a baking coach, senior baker and bread-baking fanatic! My aim is to use science, techniques and 15 years of baking experience to make you a better baker.
Table of Contents
- Why do you put water in the oven when baking bread?
- Equipment for adding water to an oven
- The best way to add steam to an oven at home
- If this method doesn’t create enough steam…
- Do I pour water into a tray and spray the oven?
- What temperature should the water be when adding it to the oven?
- The Pour, Close & Run method
- Using a spray mister way to make steam
- Using a water bath in the oven
- Using wet towels to create steam in the oven
- Can I just wet the bread instead?
- How to create steam in a Dutch oven
- Should you add steam to a Dutch oven?
- Why do you need to add steam when baking bread? – The science behind the method!
- Baking bread without steam vs with steam
- How much steam to add to the oven when baking bread?
- What does too little steam look like?
- Can I add too much steam when baking bread?
- Why is my bread dense?
- Ending thoughts on adding steam to the oven
- Adding steam to the oven – frequently asked questions
Related Recipes
Related Articles
Latest Articles
Baking Categories
Disclaimer
Address
53 Greystone Avenue
Worthing
West Sussex
BN13 1LR
UK


