Knowing how long to knead dough is one of those baking skills you’re expected to know without anyone telling you! Most bakers learn how long to knead dough through experience. Still, as it’s something that significantly impacts the quality of your bread, you’ll want to get to grips with it- even if you’re a beginner. There are many contrasting recipe methods and kneading guides that you may have seen, but do you really know how long you should be kneading for? Well, let’s look at kneading and how long you should spend on it!
The stages of kneading dough
I divide kneading up into three stages:
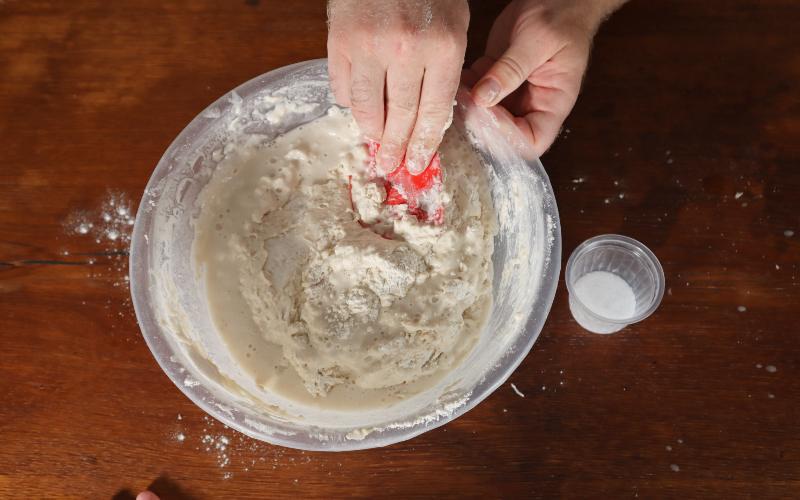
Incorporation: This is where the ingredients are combined to form a reasonably even mass. It takes around 1-2 minutes for most doughs, but up to 4 minutes for stiff ones and those with prefermented dough.

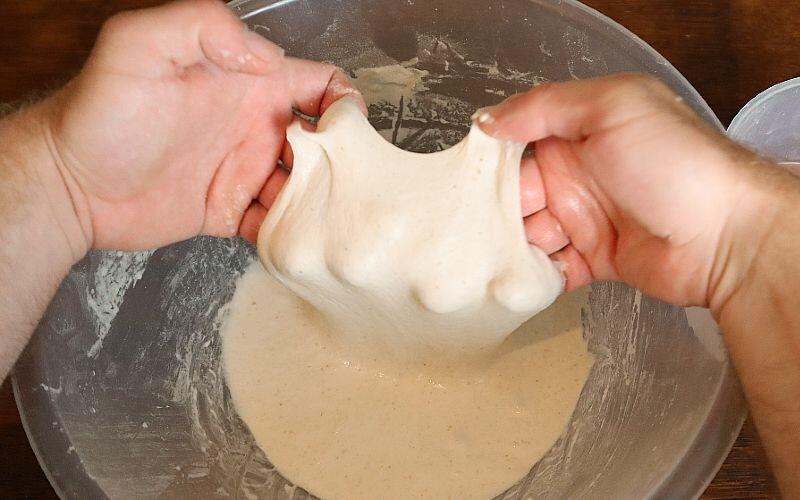
Slow kneading: The dough is gently caressed and stretched. It provides a thorough amalgamation of ingredients and encourages the gluten strands to soak up water and unwind.
Fast kneading: Here, the dough gets kneaded as fast as possible! It’s hard work, but if you can keep up, the results in the final bread will be delightful! Work the dough aggressively by slapping it down hard on the work surface.
This stage leads to the gluten being worked effectively and incorporates extra oxygen into the structure.
Why split kneading into 3 stages?
Intensive kneading is the most effective method to develop the dough. But the gluten structure can only improve if it’s well hydrated and primed beforehand. You can’t slowly stretch a dough that hasn’t been combined, and you can’t knead a dough fast if the gluten isn’t ready to be kneaded. That’s why I break it down into three stages.
Explore the kneading examples in my kneading techniques guide.
How long to knead bread dough
Once kneading has finished, we are looking for a smooth, silky dough that holds its shape. So how long should you knead dough by hand? Well, it depends on the bread being made, the flour, the length of bulk fermentation and if there are any preferments or if the flour has been autolysed.
A basic kneading length is around 15-20 minutes. This consists of around 2 minutes to incorporate the ingredients in the mixing bowl, 7 minutes to gently knead, and at least 5 to knead intensively (if you have the energy!).
You can see some examples of typical kneading lengths for bread types in the table below:
| Bread | Slow mixing (minutes) | Fast kneading (minutes) | Target bulk fermentation |
|---|---|---|---|
| Sandwich bread | 4 | 10 | 0 |
| Brioche | 5 | 4 mins, then 4 mins with the butter | 6-10 hours, chilled |
| Artisan loaf | 8 | 8 | 2-4 hours |
| Artisan loaf w preferment | 4 | 7 | 2-3 hours |
| Overnight artisan loaf | 8 | 2 | 8-12 hours, chilled |
| Ciabatta w preferment | 8 | 12 | 2 hours |
| Sourdough | 4 | 0 | 6-12 hours |
*I don’t time the length of incorporation when hand kneading anymore. It should take around 2-4 minutes, but it’ll be done when it’s done. You’ll know when it is ready when you have to remove the dough from the bowl and start kneading on the table. Larger batch sizes will take longer than smaller ones when kneading by hand.
How long to knead bread dough in a stand mixer

When using a dough mixer, kneading time is reduced. Reaching speeds unobtainable by hand, a stand mixer’s most significant time reduction is during fast kneading. There is no incorporation stage as the mixer will quickly take care of this at a slow speed. However, many bakers like to dissolve the salt and sugar (if used) beforehand in the water with the dough hook. This only takes around 30 seconds and is optional, depending on how good your mixer is at combining the ingredients.
| Bread | Slow mixing (minutes) | Fast kneading (minutes) | Target bulk fermentation |
|---|---|---|---|
| Sandwich bread | 3 | 7 | 0 |
| Brioche | 4 | 3 mins then another 2-3 mins with the butter | 6-10 hours, chilled |
| Artisan loaf | 5 | 5 | 2-4 hours |
| Artisan loaf w preferment | 4 | 4 | 2-3 hours |
| Overnight artisan loaf | 4 | 1 | 8-12 hours, chilled |
| Ciabatta w preferment | 6 | 8 | 2 hours |
| Sourdough | 3 | 0 | 6-12 hours |
Note: Not all dough mixers are as efficient at working dough as others. Use these timings as a guide and extend or decrease them as you see fit. If you’re mixing times are much longer than this, see this article: How to use a stand mixer to knead dough
If you want to understand how I’ve reached these times and the impact things like bulk fermentation and autolyse have on kneading, stay with me.
How to tell when to stop kneading dough
We can use the windowpane test to tell when a dough is ready for the bulk fermentation stage. This is where a piece of dough is stretched, and if it stretches thin enough that light can be seen, the dough is ready!
A fully developed dough that passes the windowpane test has 100% gluten development. The desired amount of gluten development at the end of mixing depends on its intended bulk fermentation length.
For doughs that bulk ferment for 2-3 hours, 75% of gluten development will be about right. The remaining 25% will occur as the dough rests. For quick bread that undergoes no first rise, the intention is to achieve 100% gluten development at the end of kneading. Only 25% development is desired for some long-fermented bread doughs, such as sourdough.

It’s hard to pass the windowpane test when kneading by hand! I discuss the challenges of achieving 100% gluten development in this post: Why won’t my dough pass the windowpane test?!!
How the first rise impacts the amount of kneading
As the dough is left to rest during the first rise (bulk fermentation), the yeast starts to produce gas, and the gluten structure matures. If left alone to develop, well-hydrated gluten will produce a fantastic gluten structure with little human intervention. By kneading the dough, we accelerate this development. Still, less kneading is preferred for long-fermented doughs, significantly less fast kneading.
As oxygen is introduced to the dough, the flour latches onto it. This serves two essential purposes:
- It enhances the bonds between gluten strands, making them stronger
- Allows the yeast to respire aerobically, where it produces carbon dioxide gas faster than anaerobically, with fewer by-products
These factors are essential in quickly risen/ no bulk fermentation bread types. In longer fermented artisan loaves, we want to reduce the effects of gluten development and oxidation when kneading. Instead, these factors develop naturally as the dough rests during bulk fermentation.
As the dough is bulk fermented, it continues to absorb oxygen -although at a lower rate. The first issue in long fermentation periods is that too much oxygen is absorbed. This leads to over-oxidation, where carotenoid pigments are destroyed, and the bread loses colour and flavour (also known as bleaching).
Another issue is that for yeast to produce those beautiful warming flavours found in the best artisan bread, it should respire anaerobically. Despite being slower to produce gas than aerobic respiration, anaerobic respiration leads to fermentation, producing ethanol. Because the rise is slower, lactic acid fermentation is also likely to produce organic acids. In sourdough bread, this will undoubtedly happen.
The combination of ethanol, organic acids and extra enzymatic activity that occur during long fermentation enhances; the flavour, aroma, freshness, dough handling properties and texture of the bread.
Less kneading is required as the gluten will mature naturally in long-fermented bread. Many bakers will supplement bulk fermentation with stretch and folds. These speed up the rate of fermentation by redistributing the ingredients. They also strengthen the gluten structure. Many bakers love them as they are a lot less strenuous than kneading!
Impact of additional stages on kneading length
How autolyse reduces mixing times
Soaking the flour using the soaker or autolyse methods kick starts the hydration of the gluten. This means that the mixing time, notably the slow kneading stage, can be reduced. Read more about the other benefits of autolysing in my autolyse guide.
How preferments reduce mixing duration
Preferments such as biga or poolish, and also to a similar degree, sourdough starter contain flour that is pre-soaked and fermented. They not only accelerate the maturation of the dough during bulk fermentation but also reduce the amount of mixing required.
How adding additions such extend kneading
The inclusion of fat and sugar is often delayed until the end of mixing. Especially when a high proportion of these items are included in the recipe, they can disrupt the development of gluten. Delaying their addition until near the end of kneading is a popular choice for the best quality dough. In bread types such as brioche (butter), ciabatta (olive oil) or pain de mie (sugar & butter), these ingredients are added once the dough has almost reached its desired gluten development. The dough is then kneaded for a few more minutes until the additions are incorporated. This takes around 2-3 minutes when using a mixer but can take 5-6 by hand if the dough or if the dough is dry and hard to knead.
When adding fruit, chocolate chips, nuts or any other ingredient you don’t want to be crushed, add them once gluten development has been achieved and incorporate them slowly. A slow knead is required to prevent the ingredient from crushing.
Preferments will take longer to disperse in the dough, especially if a stiff biga is used. In a dough mixer, it’s not noticed. The power of the mixer blends the ingredients with ease, even at a slow speed. When hand kneading dough with a preferment, the slow knead stage will last longer. However, the fast kneading time can be reduced when hand kneading or kneading in a mixer.
How flour impacts the length of kneading
All flours have different qualities which are tested at the mill. Aside from protein content, unfortunately, these results are usually hidden from us Average Joe’s unless requested. When it comes to kneading, flours take a different amount of time to bind into a dough, and some, especially the lower protein ones, struggle to pass the windowpane test after kneading. Most bakers enjoy more success using plain or all-purpose flours when making longer fermented doughs, as the weaker proteins have time to strengthen. High-protein, quality baker’s flour is preferred for quickly kneaded bread doughs.
These rules and kneading duration will change depending on the flour brand and even between batches, so some experimentation is required if you want professional results.
Conclusion on how long to knead dough
As you can see, it’s hard to figure out how long you should be kneading your dough! What is clear is that there is a direct link between how long bulk fermentation will last to how much gluten development is required. I hope this article has got you to start thinking, “how much do I need to knead” instead of “how long to knead!” How did you find this post? Was it helpful to you? What will you do differently in future? Let me know in the comments!
Frequently asked questions about how long to knead dough
If you’ve enjoyed this article and wish to treat me to a coffee, you can by following the link below – Thanks x

Hi, I’m Gareth Busby, a baking coach, head baker and bread-baking fanatic! My aim is to use science, techniques and 15 years of baking experience to help you become a better baker.
Table of Contents
- The stages of kneading dough
- How long to knead bread dough
- How long to knead bread dough in a stand mixer
- How to tell when to stop kneading dough
- How the first rise impacts the amount of kneading
- Impact of additional stages on kneading length
- Conclusion on how long to knead dough
- Frequently asked questions about how long to knead dough
Related Recipes
Related Articles
Keep up to date with the latest Articles, Recipes & Bread Baking info by joining my mailing list
Join The Weekly Bread Baker's Newsletter!
Latest Articles
Baking Categories
Disclaimer
Address
8 Woodland Avenue,
Worthing
West Sussex
BN13 3AF
UK


Leave a Reply